Friday, November 28, 2014

Niagara Falls: A Photo Essay

Hello All!

I am back. Due to school and traveling, I likely won't resume weekly posting for a few months still, so I apologize for that. However, I've managed to take the time to do some shooting, so, here you go.

Travel Photography Tips

I've decided to make this post about travel photography. I know that this is a nature photography blog, but these two genres often intersect. So, what do you need to know about travel photography?

Photographing Popular Landmarks

Nature photographers often travel to famous sites for pictures. However, this raises a problem: how can you take original photographs of something that's...well...over-photographed?

The first thing you should do is take stock of the images that are already available of that landmark. In my case, I visited Niagara Falls. A quick google search turns up this:


These are the most popular views of the park, in the most popular season for tourism (summer). Okay, so what do you do with this information? Should you avoid taking "popular" pictures?

In short, no. "Popular" views of landmark are popular for a reason - they are often accessible and flattering angles for famous land formations. There's no reason to pass up these scenes because they aren't "original." However, you should keep these landscapes in mind - and use them as a guide to expand your visual repertoire of the scene.

How do I take "original" photographs of very popular sites?

One of the simplest things you can do is to just find a different angle. Depending on what you are photographing, this may not actually be that easy, but it's worth considering. Keep in mind that you can create different "angles" simply by turning the camera, or shooting on the diagonal.


Here, turning the camera vertically adds some visual interest to a scene that is otherwise largely identical to those top hits on google image search.

Go Off Season

Visiting a popular park or site is often easier off-season, for many reasons. Firstly, it's usually cheaper to find hotels and flights. But, more importantly, once you get there, the area is less crowded, giving you more space to explore and take those unusual images you crave.
But there is another benefit.
Most landscapes will undergo seasonal change. As I noted above, summer is the most popular time to visit Niagara because of the weather. This makes pictures of the park in the fall and winter more unique, and therefore, more interesting.

A similar trick is to choose an unusual time of day. Most tourism photographs are taken midday, so if you capture a scene at sunrise, or even at night, your images will stand out as more unique.


I was lucky to catch the beginnings of the sunset while walking back to my car. This picture also displays rule #1 of finding an unusual angle: the trees in the foreground add interest to what is otherwise the same old scene of the falls. In landscape photography, having objects in the foreground can anchor an image and create an overall stronger composition. (I discuss composition in this post).


Capture a Different Scene Entirely

Some parks are a wealth of beautiful landscape, although they may boast one or two "famous" features. Don't let yourself be blinded by these photographic celebrities - search out other vistas that disregard the main attraction.


Niagara Gorge itself is quite beautiful, and the bridge and city provide interesting background elements to frame it. Niagara Falls is an interesting park because city and nature are much more integrated here than in other wild spaces in the US. Don't ignore the potential of these "foreign" elements, even in your nature photography.


Here, this feature of Niagara Falls, ON (I don't actually know what it is! Sorry!) makes for an unusual foreground to the wild white spray of Horseshoe Falls.

Similarly, including the tour boat in the image below grounds the composition and gives the viewer's eye something to focus on.

So, what do you think? Do you include man-made structures in your nature photography? What are your favorite travel photography tips? Let me know in the comments below.
Please remember to share, follow, and subscribe via the fancy sidebar options! Here is my tumblr and here I am on bloglovin.

Friday, August 15, 2014

Favorite Places: Volume II: Your Local Forest

For Volume I of My Favorite Places, click here.

So in this week's edition, I'm going to be talking about one of my favorite places for nature photography: forests.
Okay, okay, so that's not really a place. It's more correctly a habitat, I suppose. But I didn't want to make this post as narrow as the last edition of My Favorite Places, so, here we go.

The Wonder of the Forest


Forests are interesting places to explore for the nature photographer. Within, a wealth of different subjects abound. A sometimes overlooked element is landscape photography within forests. We often think of grand plains or impressive mountains when we hear "landscape." However, the forest holds a vast array of more subtle (or sometimes, more striking) landscapes to capture.


It can be a challenge to arrange the disorganized elements in a forestscape into a cohesive image. However, the landscape still features some strong stylistic elements. You will find yourself helped by the pattern of vertical lines created by tree trunks. Try picking a foreground element, in this case, a stream, to anchor your photo, and then allow the trees to do the rest of the work.
One thing you will need to watch out for is how the leaves will affect your white balance. Because landscapes like these can be overwhelmingly green, you may find your photos take on a funny, greeny-yellow color cast. Either adjust your white balance settings or tweak your images in photo editing software to take care of this.

Fowler's toad
Of course, forests are also full of wildlife. It is true that large mammals such as deer, bears, and foxes prowl the woodlands, but you are unlikely to see these animals usually. Don't despair, however. Forests are bursting with small creatures, eager to be subjects for your lens. Teach yourself to look downwards, and scour the paths for toads, insects, lizards, and other denizens of the woods. Like I've said before, don't be afraid to get your knees muddy to get the shot. Often, small creatures require you to shoot at their eye level to do them justice.

This box turtle looks as if I have personally offended him.
 You can see in this image the instant drama achieved by adjusting the camera angle to that of the turtle.

There are, of course, different types of forests, from boreal to tropical, each with its own wonders of natural history. But you don't have to travel great distances for great photography - fantastic animals are creeping their way through the leaves in your neighborhood (I promise).

All right, so have you been inspired? Or are you waiting for the winter freeze to kill all of the ticks before you venture outside? (I don't blame you.) Let me know in the comments.

Want to see more tips? Check back every Friday for a new post. Click here to follow me on Tumblr and here to follow me on Bloglovin! Don't forget you can also use the handy sidebar to subscribe via email or RSS feed.

Friday, August 8, 2014

Late Summer


The summer is fading.

It seems I have spent my summers indoors of late, due to the constraints of school and board exams.

But I do remember the summertime.


 Mostly I remember the heat, the punishment from an unrelenting sun.

I remember it not mattering.


In those days, I would rise early, stay out late into the hot afternoon, peering under every shrub and across every flower. I sought the strange, the wonderful, the mundane walks of life that crawled and crept across the vegetation and hummed through the air.
I did this alone.
A stranger in my own land, I was not moved by the rushing beat of city life. Instead, I retreated to the besieged wild spaces, to learn, to document, and to find my peace. I collected image after image, of birds, insects, flowers, anything. They stayed hidden in folders on my desktop.


(where they remain.)

We live in a world that can be overwhelming. The vast, churning wildness of tides both human and animal inclines us to pull back, disengage, lest we be consumed. This fear, this unwillingness to risk upsetting our own fragile lives, silences us. And, to escape the uncomfortable truth, we convince ourselves that no one will listen if we speak, anyway.
This is not a productive line of thought.


Look at yourself.

You are powerful.

You have the ability to influence the world - but you can't, if you silence yourself.

Images, text, speech, actions, all of these things can work to effect change. There's no reason, and no excuse, to leave the fate of your world up to others.

So, will you engage? Do you view photography as a medium for communication? Discuss.

Regular, photography-related posting should resume next Friday. Please remember to share, follow, and subscribe via the fancy sidebar options! Here is my tumblr and here I am on bloglovin.

Friday, August 1, 2014

A Brief Lesson in Photo Editing Using Photoshop Elements 9

This week I'll be discussing basic photo editing using adobe photoshop elements. I'm currently using an older version of elements, elements 9, so unfortunately this means that some of the commands won't be in the same locations as they are in different versions.

Why adobe doesn't standardize this, I don't know.

A quick overview: What is photoshop elements?

Photoshop elements is a "stripped down" version of photoshop that contains the basic commands needed for photo editing, but does not include the full range of editing options available in photoshop CS. Photoshop elements is sufficient for most hobbyists, while those seeking to take advantage of art and design features should turn to the full version of photoshop. Obviously, photoshop elements is much, much cheaper.

Okay, on to the tutorial!

Step 1: Cropping


Often times we may take a photo, but then decide later that the composition needs some work. That's where cropping comes in handy. Cropping can also be used to change the ratio of the image, making it easier to print (eg, by making it 4x6).
There are several ways to crop in photoshop. The way I find the easiest is to pick the rectangular marquee tool on the left toolbar, outlined in red. This will bring several options up at the top toolbar, which are also outlined in red. For cropping, you will want to change "feather" to "0". You can then adjust your ratio, should you desire. You can use no ratio, or "normal" mode, a fixed ratio, or a fixed size. I have mine set to a fixed ratio of 8x12, for easy printing.
The rectangular marquee changes your mouse to a cross, which you click and drag across the screen to create a rectangle. This rectangle can be moved after you make it. The area outside the rectangle will be cropped out. When you are satisfied, go to the "Image" menu across the top and select "crop."
Again, I apologize for using an old version; these items may not be in the same menus, so you may have to do a bit of hunting.

Step 2: Levels


To bring up the "Levels" tool quickly, simply press CTRL + L. You can also access it from the "enhance" menu, under "adjust lighting." The levels tool will allow you to adjust the exposure of your image.
You can see the histogram of your image in black. You also have 3 triangular pointers that you can adjust: they are coded black for shadows, gray for midtones, and white for highlights. If there is bare space in your histogram, you want to adjust the pointers to eliminate it. I have drawn in red arrows to demonstrate that I moved the white pointer left to where the histogram begins. Similarly, I moved the black pointer right. Let's see what that did.


I have zoomed in here so you can see a little better. Note the new positions of the pointers, as well as the enhanced brightness of the grasshopper.
You will notice that if you close and re-open the levels tool now, the histogram will look different.

Notice how it's broader? This is what you want.

Step 3: Shadows/Highlights

You can access the shadows/highlights tool by going to the Enhance > Adjust Lighting > Shadows/Highlights.


The first thing you may notice is that photoshop for some reason automatically drastically lightens your photo when you bring this toolbar up. To fix this, set "lighten shadows" back to 0 (or to wherever you'd like). You do this by dragging the little round marker left.
If you desire, you can also use this tool to "darken highlights," which does what it says, but I usually don't. I generally just spent step #2, levels, brightening my highlights, so I don't want to undo my hard work!
Finally, I select "midtone contrast" and increase that, usually to 7-10%, depending on the image. Again, just pick the little circle and drag it right. You can also manually type numbers into the percentage boxes.
*Make sure you have the "preview" box on the right checked so that your changes will automatically be applied to your image. 
When you are satisfied, click "ok".

Step 4: Duplicate Background Layer

Photoshop uses layers, and while you can do more with this in the full version of photoshop, layers make an appearance in photoshop elements as well. Layers allow you to do many things, including stacking effects, or altering one element of an image without changing another.
Here, we will use the layers tool because it makes our lives a little easier.


What we are going to do is make a copy of the "background." The background is the photo we've been working on - we are going to duplicate it so that we can edit it without worrying about making mistakes.
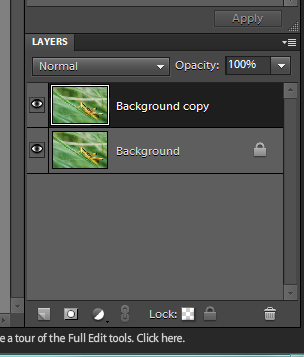
To duplicate the background, go to the "Layer" menu at the top, then select "duplicate layer." A box similar to the one shown above should pop up. Make sure it says "duplicate background" in the area I've boxed in red. Then, select "okay."

You'll notice in your lower right corner toolbar, you now suddenly have two pictures: One should say "background," while the other says "background copy." This is what you want. The little eye icon to the left of each layer determines whether or not the layer is visible. When it is unclicked, the eye will disappear, and the layer will become invisible.

Step 5: Adjust Color Curves

Curves is one feature that you have much more control over in full photoshop, but it exists in a simplified form in elements. To use this tool, go to: Enhance > Adjust Color > Adjust Color Curves.


A screen like this one should come up. You'll notice there is a "before" and "after" box on the left and right sides of the screen, respectively. This is why I've gone through the trouble of making a duplicate layer - I feel like it's impossible to actually see what you are doing on those tiny screens. With the duplicate layer, you can just overdo it and tone it down later - which is what I intend to do.

To use the Color Curves tool, you must select a style from the list on the bottom left. For basic editing, "default" is the best, but you can play with different styles to create different effects in your images. I have boxed "default" in red.

A graph will come up on the right but you can't actually do anything with it. It's mainly to remind you that adobe thinks you should really buy the full version of photoshop.

The primary thing we are interested in is the sliding toolbars in the center. You can use these to adjust the exposure and the color dynamics of your image. It can be a very powerful photo editing tool, but in elements, it's sort of "dumbed down." But it still works pretty well.

You'll want to adjust the sliders left or right, depending on your preference for your image. I generally increase both highlights and midtone brightness, and decrease midtone contrast and shadows. This tool is less intuitive than levels and requires a bit of tweaking and playing around with. However, because we have our background level copied, we can over-correct without worry.

Step 6: Adjust Layer Opacity

Okay, so now, if you're me, you've over-corrected your image to the point of ridiculousness, so we need to tone that back down.


Remember the layers toolbar I showed you earlier? At the top, there should be a box that says "opacity." I've highlighted it in red for you. Click on that box, and you should be able to adjust the opacity of your edited background copy. I've decreased mine to 45% here, but, again, the value will depend on your preference.
When you are satisfied, go to Layers > Flatten Layers, and you'll be back to having just one layer (your background).

Step 7: Finished Product

Enjoy!


What do you think? Do you use a photo editing program? How do you edit your images? Let me know below!

Did you see last week's article?


Check back next Friday for the next installment of...TwoFeetPhoto. Please remember to share, follow, and subscribe via the fancy sidebar options! Here is my tumblr and here I am on bloglovin.

Saturday, July 26, 2014

Summer: A Photo Essay

Hello! I am properly back this time, I promise. Weekly posting shall resume!

This week, I will be talking about summer nature photography and the concept of a photo essay.

A photo essay  is a series of images that documents an event or tells a story. We often associate photo essays with news photojournalism, but this does not mean they don't apply to nature photography.
What are the keys to a successful photo essay?

1. Set the scene.

In nature photography, we can become myopic about our subject matter. Close animal portraiture is nice, but does not provide any environmental context. A good photo essay should include other elements of the animal's habitat so the viewer can get a complete picture of the story.


By including both macro and scenic shots of the flower beds, I've also introduced some variety into my photographs. Now, the reader immediately has some idea of what this story is going to be about - we are outside, in a garden.

2. Introduce the main characters.

The key measure of success of a photo essay is whether not it portrays a clear story. This is easiest to achieve if you have an idea of what you want to convey before you begin shooting. My story, for example, is going to be about insect life in the heady summertime.


To simplify things a bit for the blog post (I never like to include too many photos - I feel like it becomes overwhelming), I've focused here on grasshoppers. Open, grassy areas are excellent spaces to hunt for grasshoppers, who aren't exactly the most elusive of insects. In addition, their large size makes them an accessible subject matter even to those without dedicated macro lenses. If you want some tips for insect photography, click here.

3. Subplot

If you are doing a series on an animal, it is a good idea to include different behaviors from that species, if possible. It adds more dimension to your story.


Here is a shot of a slant-faced grasshopper doing what grasshoppers do best: eat. Eating is always an interesting behavior to document.

4. Conclusion

This is the part we've been waiting for! What was the point of your story? What happens in the end? This is also the point at which you might urge the viewer to action, or force the viewer to make a decision.


We, of course, know what summer means to insects.

So, what do you think? Have you ever created a photo essay? Does yours include text, or is it only pictures? And do you think that this photo essay was successful? Let me know in the comments below!

Want to see more tips? Check back every Friday for a new post. Click here to follow me on Tumblr and here to follow me on Bloglovin! Don't forget you can also use the nifty sidebar to subscribe via email or RSS feed

Saturday, July 12, 2014

Special Effects: Advanced Photography Part II

I'm back - sorry for the delays!
Now, on to today's post. On this blog, I've mostly discussed traditional photography, emphasizing things like aperture, shutter speed, and composition. However, there are also special tricks and tips that one can employ to create unique images (without post-processing edits).

Click here to see Advanced Photography Part 1.

How to Use Shutter Speed to Create "Special Effects" with your Images

As discussed in my photography basics series, photographers adjust aperture and shutter speed to obtain accurate exposures. However, you don't have to do this. You can manipulate the shutter speed or aperture to achieve goals other than exposure.


Dreamlike exposures can be created by artificially prolonging the shutter speed and then moving the camera during the shot, producing unusual motion blur.  For this shot, I used a very slow shutter speed and a high aperture to compensate. You will need to experiment with different  exposure times to achieve the effect you desire without completely washing out your image. For each shot in this style that I like, I take about 10-15 "duds" - so keep trying different combinations.

f/32; shutter 1/8
Obviously, the longer the exposure and the more motion you create, the blurrier the end result will be. Compared the previous example, the example above is more painterly, with less detail preserved. This is due to the longer exposure.
Additionally, you should experiment not only with moving the camera body during the exposure, but also with zooming in and out with the lens.

What do you think about this technique? Have you tried it? Let me know in the comments.

Check back next Friday for the next installment of...TwoFeetPhoto. Please remember to share, follow, and subscribe via the fancy sidebar options! Here is my tumblr and here I am on bloglovin.

Friday, July 4, 2014

On Hiatus

Hello all,

The Blog will be on hiatus until July 11.

Thanks for reading,
RH

Friday, June 27, 2014

On Hiatus

Hello all,

The blog will be on hiatus until July 11.

Thanks for reading,
RH


Friday, June 20, 2014

Shades of Gray: B&W Flower Photography

With the abundance of cheap/free photo-filtering software that's available now, black and white and sepia toned photography have experienced a popularity surge. But what makes a good black and white photograph? This week's episode of TwoFeetPhoto will be all about how to take great pictures of flowers - in black and white.

Black and White Flower Photography Basics

So what are some of the elements that go into a great black and white photograph? In this post, I talk about the three main elements that make up a good photograph: subject, lighting, and composition. It's no different for black and white photography, but, as ever, there are a few extra considerations.

1. Texture

Particularly with a subject like flowers, we are drawn promptly to color. Well, that's too bad, because this post is about black and white photography.


One of the keys to producing high-quality black and white photographs is to choose a subject with lots of texture. As one element is removed from the image (color), the others (texture, composition) become more prominent. Use this to your advantage, showcasing different aspects of your subject. Photographs of roses like this one, for example, are often odes to their deep red color. However, a black and white image allows the viewer to appreciate the delicacy of each petal, the unique way they fold together to form the whole flower. These details are often overlooked in color photography.

2. Contrast

I know I titled this post, "Shades of Gray," but that doesn't mean your photograph should be a big, gray blob. When shooting in black and white, you have to think about the tones in the image, and not simply the colors. Colors of the same tone will appear the same shade of gray once converted, leading to a boring, washed-out image.


Picking scenes that have more contrast will provide for stronger photographs. They will naturally have the variation of tones needed to create an interesting black and white image.

3. Lighting

Okay, so if you've been reading my blog, you should know by now that you always need to be paying attention to your lighting. However, it becomes even more important in black and white photography. Why? Like I've said above, black and white images remove a natural focal point from a scene - color. 


Stripped of color, your subject can appear drab and boring (so pick a high tonal contrast scene!). You'll want to ensure that your lighting enhances and does not detract from your subject. This could mean several things - as mentioned in #1, texture is an important element in black and white photography. So the harsh light you would normally want to avoid may become your friend. Harsh side lighting emphasizes texture differences in subjects. So, experiment with your lighting, like usual.


4. Simplify

Like we've been talking about, black and white photography obviously cannot rely on color to make an impact. This creates a separate problem, though -- that is, how does one separate the subject from the background? Normally color is a great clue, but that doesn't apply here. You don't want your subject to blend into the background because they are the same tone. So, a scene with tonal contrast is important (sensing a trend here?).


But it's also important to simply the image. This allows the subject to have a greater impact, making up for some of the oomph it might be lacking from its colorless appearance. Additionally, having a simple background lets the subject stand apart more strongly. You can see how the black background (converted in photoshop) in the above image lends the bloom even more power.

So, what do you think? Do you ever convert images to black and white, or are you a color-lover? Let me know in the comments.
Check back next Friday for the next installment of...TwoFeetPhoto. Please remember to share, follow, and subscribe via the fancy sidebar options! Here is my tumblr and here I am on bloglovin.


Friday, June 13, 2014

Small Considerations, Creative Photography Tips, and More Wheelbug Photos

Creative Photography Tips

Surprise surprise, I'm back again! This week I'll be talking a bit more about achieving creative insect photographs.
So if you don't like bugs, look away. Because I do. (If you missed it, this article also talks about improving the artistic elements of your photography.)
Wheelbug nymph, late instar

1. See Eye to Eye
Like I've talked about previously in my article, "How to take Great Pet Photographs with a Smart Phone," perspective is important in photography. Particularly when photographing subjects that are shorter than you, it's important to bend down and shoot at eye level. The last time I checked, most insects are shorter than even me, so getting your knees dirty is important here. 
The subject's eye, in clear focus, in a photograph allows the viewer to make "eye contact," and thus feel more connected to or invested in the photograph. If you don't believe me, try it. Do a google search for animal photography. Are you more attracted to photos in which you can clearly see the animal's eyes, or not?

Wheel Bug, late instar nymph
2. Know your diagonals

This is a trick I often see portrait photographers use. To make a static shot more dynamic, tilt your camera and shoot at an angle. The strong diagonal line of the wooden railing in this shot adds drama and movement to a photo that is, quite frankly, otherwise quite boring. The new angle forces the viewer's brain to reevaluate the subject and examine it more closely, resulting in a viewer who is much more engaged with your work.
Also notice here the eye contact the insect is making with the viewer.

Yup, more wheel bugs

3. Patience is a virtue

Particularly in nature photography, some of the most striking images come from simply waiting until something fantastic happens. I followed several of these nymphs along wooden railings through a forested area of a local park. Finally, this scene happened. If you've ever watched a wheel bug, you know that they have quite interesting behaviors. When threatened, they rear up on their hind legs and splay their front two legs out. These two guys (girls?) ran into one another and got startled.
I used the flash in this photo because I realized that I needed a fast shutter speed to freeze the action of the two insects in the setting of the dim woods. As a downside, you can see the "flattening" effect the flash has on subjects - which is why I don't normally use it.

So, what do you think? Will you try any of these tips?

If you enjoyed this post, you can find me here on Tumblr or follow me here on Bloglovin'. In addition, you can utilize the snazzy sidebar items to subscribe via email or RSS feed. Check back every Friday for a new article!
Thanks for reading!

Friday, June 6, 2014

Pluses and Minuses: Exposure Compensation (Advanced Photography Part 1)

Advanced Photography Part 1: Exposure Compensation

So, you've read all of my Photography Basics series, but want more? Well, I'm here to help. This week's topic will be exposure compensation.

What is exposure compensation?
Exposure compensation is a feature you should find on most "pro-sumer" and advanced digital and film cameras. It allows you to make manual adjustments to the exposure time, separate from the aperture and shutter speed adjustments.

The button usually looks something like this:


Exposure compensation will allow you to either add or subtract time from an exposure. Usually, the increments are -0.3, -0.7, -1, 0, +0.3, +.07, +1, etc. The negative values shorten the exposure time (decrease light, increase shutter speed), while the positive values will lengthen the exposure time (more light, slower shutter). Make sense?

Okay, so when would I want to use exposure compensation?

Advanced digital cameras have complicated computers inside of them that calculate the exposure for us, eliminating the need for manual calculations for each shot. However, sometimes these computers make errors - and exposure compensation can be used to correct them. It also can be used to achieve different artistic effects in images.


White or Black Subjects

Many automatic exposure calculators have difficulty with white or black subjects, such as these egret chicks. All-white subjects, particularly against darker backgrounds, are often overexposed by automatic readings. This means you may end up with a completely white subject - not desirable. In this situation, you will want to decrease the total exposure - reducing the light and allowing detail to be rendered properly in your subject. You can use exposure compensation to do this. You will probably want to take several shots - a few with no compensation, a few with -0.3, some with -0.7, etc, depending on how bright it is. This is called bracketing your exposure, and some cameras can even be set to do it automatically. 

Sloth Bears

For very dark or black subjects, the opposite tends to be true. In-camera exposure calculators will tend to underexpose the image, resulting in an entirely black subject. Increase your exposure (positive exposure compensation) to avoid this problem.

Owlfly

Backlit Subjects

Backlit subjects suffer from being a relatively dark object in a relatively bright field. The exposure meter will be fooled by this, recognizing the overwhelmingly bright scene instead of your intended subject. This can produce a very underexposed subject. To remedy this, try bracketing your exposure upwards - ie, positive exposure compensation. Alternatively, if you want to silhouette your subject against a brilliant background (perhaps a sunset?), bracketing down (negative exposure compensation) will help you.


Strongly Illuminated Subjects

Subjects with very bright lighting may also benefit from bracketing down of your exposure. Taking multiple shots with different exposure settings is the key to achieving the perfect exposure in difficult lighting.

So, have you ever used the exposure compensation setting on your camera? Do you use automatic bracketing? Let me know!

Did you see last week's post on why you should always bring your camera?

Want to see more tips? Check back every Friday for a new post. Click here to follow me on Tumblr and here to follow me on Bloglovin! Don't forget you can also use the nifty sidebar to subscribe via email or RSS feed


Friday, May 30, 2014

Little Surprises (Or, why you should always take your camera)

The first problem of photography is locating your subject - and that's what this week's post is about.

As much as is reasonably possible, you should always try to carry your camera with you.

This is because opportunities have a nasty tendency of popping up when you least expect them. A walk around your apartment complex suddenly becomes a photo session; you spy an unusual bird in the walmart parking lot (this has happened to me); your friend brings her adorable puppy to a party, etc. All of these situations make for great photography, but not if you don't have your camera.

Late instar grasshopper

This is the guiding principle of street photography, but we hardly think of it for nature photography. It's as if "nature" has retreated to its own little place in the world, and we can't encounter it unless we go specifically looking. Well, I contend that this is a false notion. Due to encroachment and habitat loss, urban wildlife are becoming more adaptable and more common.

Grasshopper nymph

Of course, as you shouldn't be surprised to hear at this point, insects are the queens of urban animal life. Small and highly adaptable, insect species flourish where other animals are unable to survive. This means that there is likely a whole safari of creatures waiting outside your front door.

...Have you gone to look yet?

Grasshopper nymph

 I wanted to highlight these little grasshopper nymph pictures because I took them in a flower pot outside my apartment door. To clarify, it's not a garden; it's a single flower pot. And it's not even my flower pot. Having my camera on hand whenever I go outside allows me to capture unexpected critters like these. And hey, they look pretty cool, right?

So how about you? Are you glued to your camera, or do you tend to leave it at home?
Insects not your thing? Check out my article on bird photography.

Want to see more tips? Check back every Friday for a new post. Click here to follow me on Tumblr and here to follow me on Bloglovin! Don't forget you can also use the handy sidebar to subscribe via email or RSS feed.