Showing posts with label flowers. Show all posts

Friday, February 27, 2015

Spring Interlude: Flower Photography Tips

Hello all! We've had a bit of warm weather down here in Texas, so spring flowers have already started blooming. I thought I would take the opportunity to talk a bit more about flower photography basics.


Let's get started.

Step One: Think about Focus

Flowers are complicated because they have lots of parts. Think about it: there are petals, leaves, stamens, and maybe even other features designed to attract pollinators. From a nature photography standpoint, these many pieces create a problem, because each exists in a different plane of focus. The pistils and stamens leap forward, leaves droop back toward the ground, and petals hover delicately in between. You can't really capture all of these elements in crisp focus in one frame - so what do you focus on?
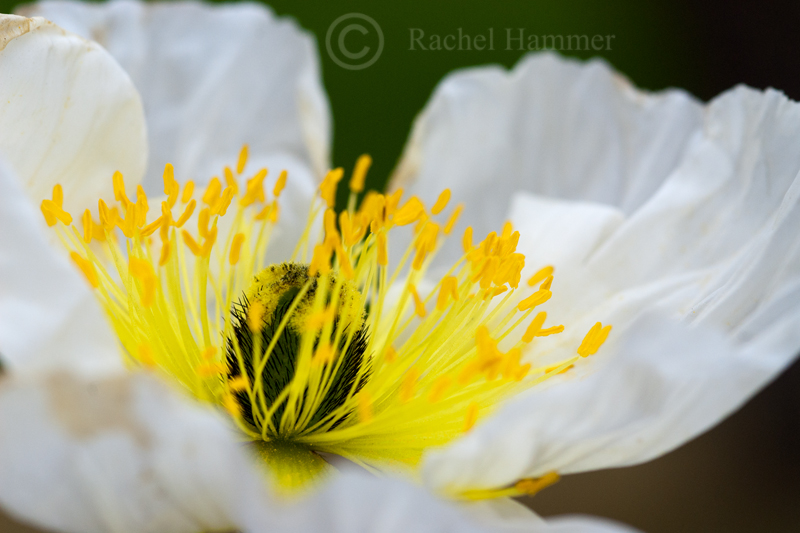


Take these two photos, for example. Which one do you like best? You can see that the focus is slightly different between them, with the second image focusing on the pistils closest to the viewer, rendering the center of the flower soft.

I actually prefer the first image, but I didn't know this while I was shooting. This brings me to my point about how to solve the focus problem - you should experiment in the field, taking different pictures of the same flower but changing your point of focus. Manual focus is very helpful for this.

Step Two: Corral a Composition

Flowers seem to pose one of two compositional problems for the photographer: they are either spectacularly, awkwardly alone, or are clumsily smashed together with many of their brethren. How do you address these problems?
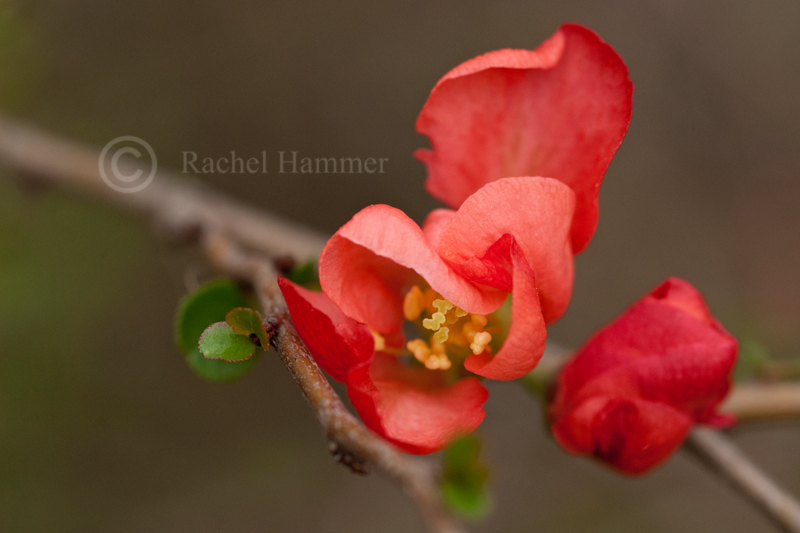

The Awkward Loner

There are a couple ways to deal with the awkward loner. One method, as demonstrated in the photo above, is to include other elements of the plant in the picture. Here, the diagonal branch adds dynamic movement to a static picture of a red flower, alone. The small, green leaves lend contrast and extra detail that help situate the flower in its environment. In short, take a picture of the whole plant, rather than just the flower. This is also a good tip if you do not own macro equipment.

The other treatment the awkward loner often gets is demonstrated by the pictures I showed you earlier. Here, let's look at one again.


A frame-filling macro eliminates the clumsiness of a big flower on a tall, spindly stalk. The downside of this method is that it requires dedicated macro equipment.

The "Too Many Friends" Flower 

Ever try to take a group picture? How about a group picture of children? Then you already know what I'm talking about when I discuss the difficulty of achieving a coherent composition in group photos. Sometimes flowers grow in groups. They grow haphazardly, aggressively, each straining toward the sun in a different direction. It can be difficult to create a pleasing image in these circumstances.


There are a couple of things to consider:

1. Use depth of field to your advantage. You can see in the image above that the flowers in the background are in a different plane of focus from the subject flower. Thus they are softer and not as distracting.

2. Get closer. Crop distracting elements out of the frame, such as large leaves or flowers that are steadfastly not helping your composition.

3. Understand the motion of the picture. Flowers can be difficult to photograph because they are static and can become boring. A group of flowers can lend interest. Notice how the subject flower is pointing upward, while the background flowers are pointing down. This visual conflict simulates motion and encourages the viewer to keep looking.

All right! Those are my solutions to some of the biggest problems I struggle with in flower photography. Now it's your turn - what are some of your best tips for flower photography?

If you enjoyed this post, you can find me here on Tumblr or follow me here on Bloglovin'. In addition, you can utilize the snazzy sidebar items to subscribe via email or RSS feed. Check back every Friday for a new article!
Thanks for reading!

Friday, June 20, 2014

Shades of Gray: B&W Flower Photography

With the abundance of cheap/free photo-filtering software that's available now, black and white and sepia toned photography have experienced a popularity surge. But what makes a good black and white photograph? This week's episode of TwoFeetPhoto will be all about how to take great pictures of flowers - in black and white.

Black and White Flower Photography Basics

So what are some of the elements that go into a great black and white photograph? In this post, I talk about the three main elements that make up a good photograph: subject, lighting, and composition. It's no different for black and white photography, but, as ever, there are a few extra considerations.

1. Texture

Particularly with a subject like flowers, we are drawn promptly to color. Well, that's too bad, because this post is about black and white photography.


One of the keys to producing high-quality black and white photographs is to choose a subject with lots of texture. As one element is removed from the image (color), the others (texture, composition) become more prominent. Use this to your advantage, showcasing different aspects of your subject. Photographs of roses like this one, for example, are often odes to their deep red color. However, a black and white image allows the viewer to appreciate the delicacy of each petal, the unique way they fold together to form the whole flower. These details are often overlooked in color photography.

2. Contrast

I know I titled this post, "Shades of Gray," but that doesn't mean your photograph should be a big, gray blob. When shooting in black and white, you have to think about the tones in the image, and not simply the colors. Colors of the same tone will appear the same shade of gray once converted, leading to a boring, washed-out image.


Picking scenes that have more contrast will provide for stronger photographs. They will naturally have the variation of tones needed to create an interesting black and white image.

3. Lighting

Okay, so if you've been reading my blog, you should know by now that you always need to be paying attention to your lighting. However, it becomes even more important in black and white photography. Why? Like I've said above, black and white images remove a natural focal point from a scene - color. 


Stripped of color, your subject can appear drab and boring (so pick a high tonal contrast scene!). You'll want to ensure that your lighting enhances and does not detract from your subject. This could mean several things - as mentioned in #1, texture is an important element in black and white photography. So the harsh light you would normally want to avoid may become your friend. Harsh side lighting emphasizes texture differences in subjects. So, experiment with your lighting, like usual.


4. Simplify

Like we've been talking about, black and white photography obviously cannot rely on color to make an impact. This creates a separate problem, though -- that is, how does one separate the subject from the background? Normally color is a great clue, but that doesn't apply here. You don't want your subject to blend into the background because they are the same tone. So, a scene with tonal contrast is important (sensing a trend here?).


But it's also important to simply the image. This allows the subject to have a greater impact, making up for some of the oomph it might be lacking from its colorless appearance. Additionally, having a simple background lets the subject stand apart more strongly. You can see how the black background (converted in photoshop) in the above image lends the bloom even more power.

So, what do you think? Do you ever convert images to black and white, or are you a color-lover? Let me know in the comments.
Check back next Friday for the next installment of...TwoFeetPhoto. Please remember to share, follow, and subscribe via the fancy sidebar options! Here is my tumblr and here I am on bloglovin.


Friday, April 18, 2014

Tiny Delicacies

As a follow-up to last week's post on macro photography, I've decided to dedicate this post to flowers. Not sunflowers, or over-enthusiastic roses, but tiny, delicate flowers, wildflowers, weeds. In other words, flowers that are great subjects for macro photography.


These are the sorts of flowers, just centimeters across, that are trampled by hikers, unnoticed in the great outdoors. In last week's post, I talked about the wonder of macro photography stemming from the artist's ability to expose an unseen world to the viewer. In many cases, these flowers appear strange or unusual simply because we never look at them.

Here are my tips for macro flower photography:

1. Angle


Many of these little flowers hang downward. Unassuming from above, their petals often hide intricate structures or patterns that make for appealing visual subjects. Don't be afraid to sit in the dirt to get these kinds of shots - it's okay. No one's looking, right?
Additionally, you can use the angle at which you approach your subject to either emphasize or downplay their tininess. 

 2. Appreciate Detail
As mentioned above, these flowers often hide complexities that we otherwise do not appreciate. Don't be afraid to get as close as you can, even taking extreme macros if you have the equipment to do so.
Bluebonnet
Even familiar flowers, like this Texas bluebonnet above, can become exotic and unusual when captured with a macro lens. Notice how the detail in the varying flower structures keeps the image interesting, balancing the vibrant blue tones.

3. Stability

Macro flower photography suffers from the same difficulties that any other macro photography does - namely, the magnification of unwanted motion in the frame. Particularly for flower photography, the wind can be a frustrating enemy to battle. 

The best advice I can give you, short of buying this device, a clamp designed to hold plants still in the wind, is to shoot in the early morning. You are probably doing that anyway - look at you! The morning tends to be the calmest time of day, in terms of wind. However, some days the weather just won't cooperate with you, and you'll have to find something else to shoot.
Of course, you could always play with artistic effects using a slow shutter speed and wind, but that discussion is for another post.

4. Accept Surprises

One of - in my opinion, anyway - the best things about macro photography is that you sometimes discover one thing while looking for another. Incorporating other wildlife always adds interest to a static shot.

Reduviid bug on Foxglove

So, are you going to try miniature flower photography this weekend? Or is this style of macro not for you? I'd love to hear your thoughts, and thanks for reading!

You can also check out this post I wrote about composition in flower photography.

Want to see more tips? Check back every Friday for a new post. Click here to follow me on Tumblr and here to follow me on Bloglovin! Don't forget you can also use the nifty sidebar to subscribe via email or RSS feed


Friday, March 7, 2014

Under a Somber Sky: Lighting Tips


The morning greeted me with a chill silence, grey and damp. Clouds blanketed the sun and the heavy humidity stuck to my skin. I shivered and zipped up my sweater.
Today would be a great day for macros.


As photographers, we worship the light, chase it, cater to it, long for it. However we must not forget the utility of cloud cover. Clouds allow for soft, diffused light that coaxes the vibrancy from flower petals and greenery. In harsh daytime light, many of the subtle colors of flowers get washed out or overwhelmed by the sheer intensity of the light. Heavy cloud cover prevents this problem, allowing for brilliant portraits. 
Of course, with the heavy clouds overhead the problem of darkness follows - it may be too dim to get the fast shutter speeds needed for sharp images of quick-moving insects or birds. Thus, I mostly stick to shooting flowers in these circumstances - but that doesn't mean you have to.
Diffused lighting allows for the delicate color palette of this flower to be captured without the "bleaching" of the white petals produced by bright overhead sunshine
A morning with heavy cloud cover provides other opportunities as well. The lack of sunshine means that morning delicacies such as dew hang around longer, as the light needed to evaporate them is missing.
Here you can see not only the dewdrops, but how vibrantly the blue and yellow tones have been rendered.


Dew drops are always a treat to discover because they add another layer of detail to macro subjects. The layered textures in the above photograph create new interest in an image that otherwise would rely on color and composition only.

Finally, soft morning light allows for more detail to be rendered in textured subjects, versus harsh, overhead midday light. Strong noontime lighting will destroy the subtle shadows of fine textures, such as the veining on this leaf above. Note also the richness of the color tones afforded by the overcast lighting.

What do you think about photographing under cloud cover? What is your favorite kind of lighting? I talk about evening lighting in this post.
If you enjoyed this post, you can find me here on Tumblr or follow me here on Bloglovin'. In addition, you can utilize the snazzy sidebar items to subscribe via email or RSS feed. Check back every Friday for a new article!
Thanks for reading!

Friday, January 24, 2014

Q: How to Give Life to Still Photographs of Still Things

One of the challenges of photography is imparting life and motion to a still record of a scene. In some cases this is quite simple. One frame of an eagle's swoop looks just as exciting as a video of the entire event. Indeed, still photographs of animals in action can intensify the drama, as the viewer begins to anticipate what will happen next, what occurred after the photo.
This is not true of plants. Plants don't swoop, or dive, or flash brilliant and bizarre mating feathers. Plants are the connoisseurs of slow. They grow, they mate, they fight, at a creeping, deliberate pace, too gradual for us to detect.
So how can one lend the same interest and excitement to plant photography as is characteristic of animal photography?

1. Develop an appreciation for color and shape.
Brilliant, saturated colors steep many flowers. However, the key to developing interest and excitement in flower photography is variety of both color and form. An endless field of red flowers may make for a striking landscape, but then become overpowering for a macro shot. To avoid visual oversaturation, try to mix different species of plant in the same frame, if possible. This is often quite easy to do if you are shooting in a botanical garden, where different flowers are arranged for you in ways that are already visually pleasing.

If you are shooting a single type of flower, try to incorporate different parts of the plant (ie stalks or leaves) to add variety. Alternatively, a shallow depth of field can be used to your advantage to paint areas of blurriness and sharpness and avoid monotony.

2. Use Visual Cues to Suggest Motion
In a photograph of a tiger leaping, the brain picks up on visual cues that allow you to interpret the picture as "action" - the stance of the tiger, the position of his paws, or perhaps the fact that he is no longer touching the ground. Similarly, compositional cues in still photos can be used to suggest motion and "trick" the brain.

In this picture, for example, the seed pod has been photographed at a lower angle, making it appear to be emerging from the flowers. This view is much more dynamic than if the pod had been photographed "head-on".
Here's another, more subtle, example.

In this image, the strong vertical lines suggest an upward motion of the flower, which is open to the sun. This composition works to create the feeling that the flower is "reaching" upwards, when, in reality, we know it is (relatively) static.

What sorts of tricks do you use to add interest to your flower photography?