Showing posts with label creative. Show all posts

Friday, March 6, 2015

Under Your Feet: Abstract Winter Macro Photography

Hello all! I hope this post finds you well. Like I discussed in this post last year, winter nature photography can be difficult. I mean, who really wants to go outside when it's cold, right? Well, I hope to convince you that there are lots of great reasons to try macro photography in the winter.


Searching for Patterns

Snow and ice add interesting detail to nature. However, instead of always choosing to compose a typical winter landscape blanketed in snow, try focusing in on abstract patterns created by this strange precipitation.

The photo above is of an oak tree, frosted with snow. By zooming in on familiar objects, foreign and unusual topographies are revealed. This, of course, is the quest of the macro photographer - but you don't need a macro lens to achieve this. This photo above was taken with a standard kit lens, for example.

Ice Worship

I prefer ice to snow for winter macros. While snow covers detail, ice often accentuates it, creating strange bubbles and patterns on top of boring objects.


The way the ice emphasized the outlines of these twigs turns an utterly unremarkable composition into an intriguing image. 


Similarly here. The gravel peeking up above the ice layer adds another element of depth to the pattern.


Here, the contrast of the green grass with the icy winter feel of the rest of the photograph provides visual interest.

The theme with these winter ice macros is looking down. That is, I walked outside, looked around at my apartment complex in the ice, and then looked at my feet. I realized that I was standing on beautiful macro subjects that I had almost passed by, because I almost didn't look.

So, grab your camera, get outside, and don't forget to look at your feet every once in a while.

What's your favorite winter photography tip? Let me know in the comments!

Want to see more tips? Check back every Friday for a new post. Click here to follow me on Tumblr and here to follow me on Bloglovin! Don't forget you can also use the nifty sidebar to subscribe via email or RSS feed

Friday, February 27, 2015

Spring Interlude: Flower Photography Tips

Hello all! We've had a bit of warm weather down here in Texas, so spring flowers have already started blooming. I thought I would take the opportunity to talk a bit more about flower photography basics.


Let's get started.

Step One: Think about Focus

Flowers are complicated because they have lots of parts. Think about it: there are petals, leaves, stamens, and maybe even other features designed to attract pollinators. From a nature photography standpoint, these many pieces create a problem, because each exists in a different plane of focus. The pistils and stamens leap forward, leaves droop back toward the ground, and petals hover delicately in between. You can't really capture all of these elements in crisp focus in one frame - so what do you focus on?


Take these two photos, for example. Which one do you like best? You can see that the focus is slightly different between them, with the second image focusing on the pistils closest to the viewer, rendering the center of the flower soft.

I actually prefer the first image, but I didn't know this while I was shooting. This brings me to my point about how to solve the focus problem - you should experiment in the field, taking different pictures of the same flower but changing your point of focus. Manual focus is very helpful for this.

Step Two: Corral a Composition

Flowers seem to pose one of two compositional problems for the photographer: they are either spectacularly, awkwardly alone, or are clumsily smashed together with many of their brethren. How do you address these problems?


The Awkward Loner

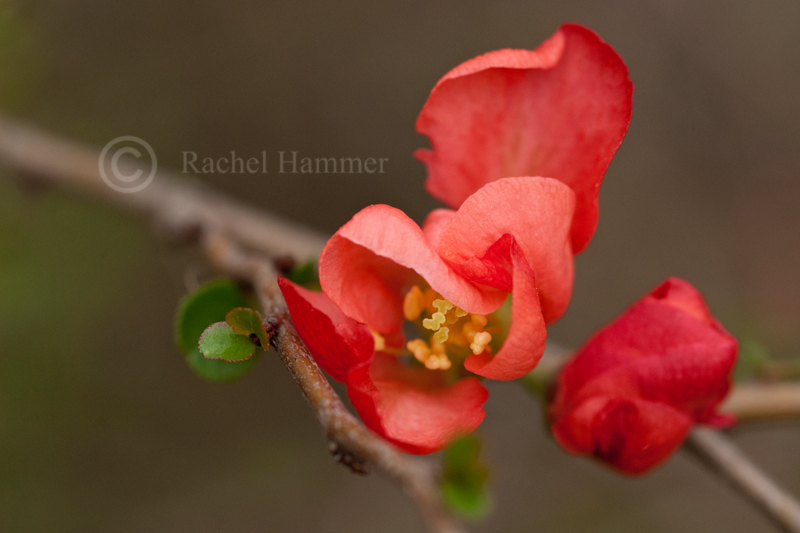
There are a couple ways to deal with the awkward loner. One method, as demonstrated in the photo above, is to include other elements of the plant in the picture. Here, the diagonal branch adds dynamic movement to a static picture of a red flower, alone. The small, green leaves lend contrast and extra detail that help situate the flower in its environment. In short, take a picture of the whole plant, rather than just the flower. This is also a good tip if you do not own macro equipment.

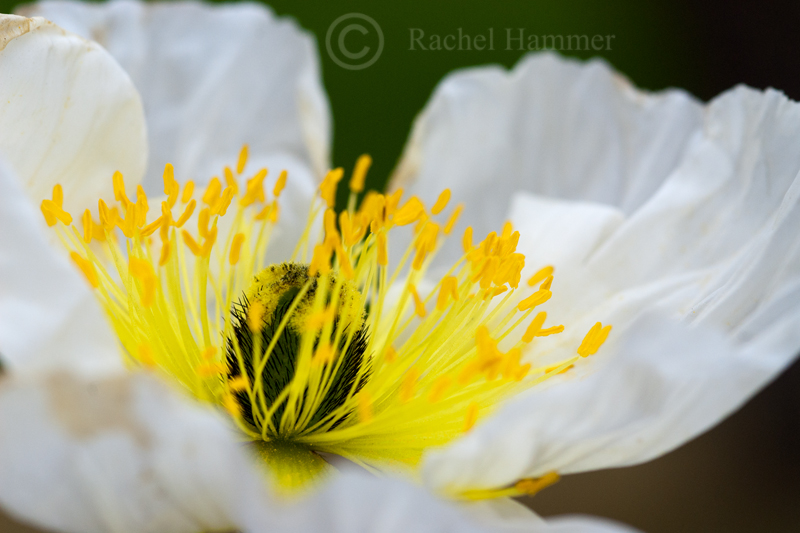
The other treatment the awkward loner often gets is demonstrated by the pictures I showed you earlier. Here, let's look at one again.


A frame-filling macro eliminates the clumsiness of a big flower on a tall, spindly stalk. The downside of this method is that it requires dedicated macro equipment.

The "Too Many Friends" Flower 

Ever try to take a group picture? How about a group picture of children? Then you already know what I'm talking about when I discuss the difficulty of achieving a coherent composition in group photos. Sometimes flowers grow in groups. They grow haphazardly, aggressively, each straining toward the sun in a different direction. It can be difficult to create a pleasing image in these circumstances.


There are a couple of things to consider:

1. Use depth of field to your advantage. You can see in the image above that the flowers in the background are in a different plane of focus from the subject flower. Thus they are softer and not as distracting.

2. Get closer. Crop distracting elements out of the frame, such as large leaves or flowers that are steadfastly not helping your composition.

3. Understand the motion of the picture. Flowers can be difficult to photograph because they are static and can become boring. A group of flowers can lend interest. Notice how the subject flower is pointing upward, while the background flowers are pointing down. This visual conflict simulates motion and encourages the viewer to keep looking.

All right! Those are my solutions to some of the biggest problems I struggle with in flower photography. Now it's your turn - what are some of your best tips for flower photography?

If you enjoyed this post, you can find me here on Tumblr or follow me here on Bloglovin'. In addition, you can utilize the snazzy sidebar items to subscribe via email or RSS feed. Check back every Friday for a new article!
Thanks for reading!

Friday, November 28, 2014

Niagara Falls: A Photo Essay

Hello All!

I am back. Due to school and traveling, I likely won't resume weekly posting for a few months still, so I apologize for that. However, I've managed to take the time to do some shooting, so, here you go.

Travel Photography Tips

I've decided to make this post about travel photography. I know that this is a nature photography blog, but these two genres often intersect. So, what do you need to know about travel photography?

Photographing Popular Landmarks

Nature photographers often travel to famous sites for pictures. However, this raises a problem: how can you take original photographs of something that's...well...over-photographed?

The first thing you should do is take stock of the images that are already available of that landmark. In my case, I visited Niagara Falls. A quick google search turns up this:


These are the most popular views of the park, in the most popular season for tourism (summer). Okay, so what do you do with this information? Should you avoid taking "popular" pictures?

In short, no. "Popular" views of landmark are popular for a reason - they are often accessible and flattering angles for famous land formations. There's no reason to pass up these scenes because they aren't "original." However, you should keep these landscapes in mind - and use them as a guide to expand your visual repertoire of the scene.

How do I take "original" photographs of very popular sites?

One of the simplest things you can do is to just find a different angle. Depending on what you are photographing, this may not actually be that easy, but it's worth considering. Keep in mind that you can create different "angles" simply by turning the camera, or shooting on the diagonal.


Here, turning the camera vertically adds some visual interest to a scene that is otherwise largely identical to those top hits on google image search.

Go Off Season

Visiting a popular park or site is often easier off-season, for many reasons. Firstly, it's usually cheaper to find hotels and flights. But, more importantly, once you get there, the area is less crowded, giving you more space to explore and take those unusual images you crave.
But there is another benefit.
Most landscapes will undergo seasonal change. As I noted above, summer is the most popular time to visit Niagara because of the weather. This makes pictures of the park in the fall and winter more unique, and therefore, more interesting.

A similar trick is to choose an unusual time of day. Most tourism photographs are taken midday, so if you capture a scene at sunrise, or even at night, your images will stand out as more unique.


I was lucky to catch the beginnings of the sunset while walking back to my car. This picture also displays rule #1 of finding an unusual angle: the trees in the foreground add interest to what is otherwise the same old scene of the falls. In landscape photography, having objects in the foreground can anchor an image and create an overall stronger composition. (I discuss composition in this post).


Capture a Different Scene Entirely

Some parks are a wealth of beautiful landscape, although they may boast one or two "famous" features. Don't let yourself be blinded by these photographic celebrities - search out other vistas that disregard the main attraction.


Niagara Gorge itself is quite beautiful, and the bridge and city provide interesting background elements to frame it. Niagara Falls is an interesting park because city and nature are much more integrated here than in other wild spaces in the US. Don't ignore the potential of these "foreign" elements, even in your nature photography.


Here, this feature of Niagara Falls, ON (I don't actually know what it is! Sorry!) makes for an unusual foreground to the wild white spray of Horseshoe Falls.

Similarly, including the tour boat in the image below grounds the composition and gives the viewer's eye something to focus on.

So, what do you think? Do you include man-made structures in your nature photography? What are your favorite travel photography tips? Let me know in the comments below.
Please remember to share, follow, and subscribe via the fancy sidebar options! Here is my tumblr and here I am on bloglovin.

Friday, August 8, 2014

Late Summer


The summer is fading.

It seems I have spent my summers indoors of late, due to the constraints of school and board exams.

But I do remember the summertime.


 Mostly I remember the heat, the punishment from an unrelenting sun.

I remember it not mattering.


In those days, I would rise early, stay out late into the hot afternoon, peering under every shrub and across every flower. I sought the strange, the wonderful, the mundane walks of life that crawled and crept across the vegetation and hummed through the air.
I did this alone.
A stranger in my own land, I was not moved by the rushing beat of city life. Instead, I retreated to the besieged wild spaces, to learn, to document, and to find my peace. I collected image after image, of birds, insects, flowers, anything. They stayed hidden in folders on my desktop.


(where they remain.)

We live in a world that can be overwhelming. The vast, churning wildness of tides both human and animal inclines us to pull back, disengage, lest we be consumed. This fear, this unwillingness to risk upsetting our own fragile lives, silences us. And, to escape the uncomfortable truth, we convince ourselves that no one will listen if we speak, anyway.
This is not a productive line of thought.


Look at yourself.

You are powerful.

You have the ability to influence the world - but you can't, if you silence yourself.

Images, text, speech, actions, all of these things can work to effect change. There's no reason, and no excuse, to leave the fate of your world up to others.

So, will you engage? Do you view photography as a medium for communication? Discuss.

Regular, photography-related posting should resume next Friday. Please remember to share, follow, and subscribe via the fancy sidebar options! Here is my tumblr and here I am on bloglovin.

Saturday, July 26, 2014

Summer: A Photo Essay

Hello! I am properly back this time, I promise. Weekly posting shall resume!

This week, I will be talking about summer nature photography and the concept of a photo essay.

A photo essay  is a series of images that documents an event or tells a story. We often associate photo essays with news photojournalism, but this does not mean they don't apply to nature photography.
What are the keys to a successful photo essay?

1. Set the scene.

In nature photography, we can become myopic about our subject matter. Close animal portraiture is nice, but does not provide any environmental context. A good photo essay should include other elements of the animal's habitat so the viewer can get a complete picture of the story.


By including both macro and scenic shots of the flower beds, I've also introduced some variety into my photographs. Now, the reader immediately has some idea of what this story is going to be about - we are outside, in a garden.

2. Introduce the main characters.

The key measure of success of a photo essay is whether not it portrays a clear story. This is easiest to achieve if you have an idea of what you want to convey before you begin shooting. My story, for example, is going to be about insect life in the heady summertime.


To simplify things a bit for the blog post (I never like to include too many photos - I feel like it becomes overwhelming), I've focused here on grasshoppers. Open, grassy areas are excellent spaces to hunt for grasshoppers, who aren't exactly the most elusive of insects. In addition, their large size makes them an accessible subject matter even to those without dedicated macro lenses. If you want some tips for insect photography, click here.

3. Subplot

If you are doing a series on an animal, it is a good idea to include different behaviors from that species, if possible. It adds more dimension to your story.


Here is a shot of a slant-faced grasshopper doing what grasshoppers do best: eat. Eating is always an interesting behavior to document.

4. Conclusion

This is the part we've been waiting for! What was the point of your story? What happens in the end? This is also the point at which you might urge the viewer to action, or force the viewer to make a decision.


We, of course, know what summer means to insects.

So, what do you think? Have you ever created a photo essay? Does yours include text, or is it only pictures? And do you think that this photo essay was successful? Let me know in the comments below!

Want to see more tips? Check back every Friday for a new post. Click here to follow me on Tumblr and here to follow me on Bloglovin! Don't forget you can also use the nifty sidebar to subscribe via email or RSS feed

Friday, June 13, 2014

Small Considerations, Creative Photography Tips, and More Wheelbug Photos

Creative Photography Tips

Surprise surprise, I'm back again! This week I'll be talking a bit more about achieving creative insect photographs.
So if you don't like bugs, look away. Because I do. (If you missed it, this article also talks about improving the artistic elements of your photography.)
Wheelbug nymph, late instar

1. See Eye to Eye
Like I've talked about previously in my article, "How to take Great Pet Photographs with a Smart Phone," perspective is important in photography. Particularly when photographing subjects that are shorter than you, it's important to bend down and shoot at eye level. The last time I checked, most insects are shorter than even me, so getting your knees dirty is important here. 
The subject's eye, in clear focus, in a photograph allows the viewer to make "eye contact," and thus feel more connected to or invested in the photograph. If you don't believe me, try it. Do a google search for animal photography. Are you more attracted to photos in which you can clearly see the animal's eyes, or not?

Wheel Bug, late instar nymph
2. Know your diagonals

This is a trick I often see portrait photographers use. To make a static shot more dynamic, tilt your camera and shoot at an angle. The strong diagonal line of the wooden railing in this shot adds drama and movement to a photo that is, quite frankly, otherwise quite boring. The new angle forces the viewer's brain to reevaluate the subject and examine it more closely, resulting in a viewer who is much more engaged with your work.
Also notice here the eye contact the insect is making with the viewer.

Yup, more wheel bugs

3. Patience is a virtue

Particularly in nature photography, some of the most striking images come from simply waiting until something fantastic happens. I followed several of these nymphs along wooden railings through a forested area of a local park. Finally, this scene happened. If you've ever watched a wheel bug, you know that they have quite interesting behaviors. When threatened, they rear up on their hind legs and splay their front two legs out. These two guys (girls?) ran into one another and got startled.
I used the flash in this photo because I realized that I needed a fast shutter speed to freeze the action of the two insects in the setting of the dim woods. As a downside, you can see the "flattening" effect the flash has on subjects - which is why I don't normally use it.

So, what do you think? Will you try any of these tips?

If you enjoyed this post, you can find me here on Tumblr or follow me here on Bloglovin'. In addition, you can utilize the snazzy sidebar items to subscribe via email or RSS feed. Check back every Friday for a new article!
Thanks for reading!

Friday, May 30, 2014

Little Surprises (Or, why you should always take your camera)

The first problem of photography is locating your subject - and that's what this week's post is about.

As much as is reasonably possible, you should always try to carry your camera with you.

This is because opportunities have a nasty tendency of popping up when you least expect them. A walk around your apartment complex suddenly becomes a photo session; you spy an unusual bird in the walmart parking lot (this has happened to me); your friend brings her adorable puppy to a party, etc. All of these situations make for great photography, but not if you don't have your camera.

Late instar grasshopper

This is the guiding principle of street photography, but we hardly think of it for nature photography. It's as if "nature" has retreated to its own little place in the world, and we can't encounter it unless we go specifically looking. Well, I contend that this is a false notion. Due to encroachment and habitat loss, urban wildlife are becoming more adaptable and more common.

Grasshopper nymph

Of course, as you shouldn't be surprised to hear at this point, insects are the queens of urban animal life. Small and highly adaptable, insect species flourish where other animals are unable to survive. This means that there is likely a whole safari of creatures waiting outside your front door.

...Have you gone to look yet?

Grasshopper nymph

 I wanted to highlight these little grasshopper nymph pictures because I took them in a flower pot outside my apartment door. To clarify, it's not a garden; it's a single flower pot. And it's not even my flower pot. Having my camera on hand whenever I go outside allows me to capture unexpected critters like these. And hey, they look pretty cool, right?

So how about you? Are you glued to your camera, or do you tend to leave it at home?
Insects not your thing? Check out my article on bird photography.

Want to see more tips? Check back every Friday for a new post. Click here to follow me on Tumblr and here to follow me on Bloglovin! Don't forget you can also use the handy sidebar to subscribe via email or RSS feed.

Friday, May 16, 2014

One Small Square

Continuing my mini-series about insect photography this week, I've decided to talk a little bit about biodiversity. Last week, I wrote about the importance of developing a theme or a purpose for your work. Well, one of my personal themes is to showcase the local biodiversity available within easy reach - right in your backyard, if you will.
Wheel Bug Nymph (as far as I can tell - correct me if you have a better idea!)
This is part of the beauty of insects - they are weird and wonderful, and a lot easier to access than classic "great" subjects of animal photography (eg, lions, elephants, etc). If you haven't spent some time looking at our six-legged neighbors, well, you're missing out. Insects are the most successful group of animals in existence. In fact, there are more species of beetle alone than of any other animal.
Ironically, I don't have any beetles in this post. Whoops.

Why are Insects Important?

Insects are an important group of animals for many reasons. Firstly, they form the base of the food pyramid, supporting small mammals, birds, and reptiles. These smaller vertebrates (insects, as you may recall, are invertebrates) can then support larger predator animals, which, eventually, support us.
Additionally, insects directly support the human population by pollinating most of the fruits and vegetables we enjoy. This is why colony collapse disorder, in honey bees, is such an important issue. If the honey bee disappears completely, the negative impact on our food supply would be catastrophic.

Ok, so I screwed up here also, and didn't manage to include any honey bee images. How about a carpenter bee?

What does this have to do with photography?

As photographers, we have the choice to use our skills to bring awareness to different issues, whether they be social, political, or environmental. Don't be defeatist and think that no one wants to hear your opinion - with photography and other visual arts, you can show people your opinion, and force them to think about current issues. I believe that this is the best use of nature photography, to inspire people toward greater environmental stewardship and engagement.


So what's with the title?

Well, now it's time for you to try a little experiment for yourself (did you try the challenge in last week's post?). You will need a notebook, a macro lens if you have one, your smart phone, or some other device capable of recording what you see. Pick an area of ground - it can be a flower patch, a tree, a stream - and sit. I hope it's a nice day outside where you are! Watch what comes by - fish, mammals, insects - and record them. When's the last time you did something like this? How many species did you find? This is a measure of your local biodiversity, and a reminder that, without your help, it may vanish, forever.

Great Purple Hairstreak
So, what's your passion? Whatever it is, remember that there are many ways you can help forward progressive causes in today's "information age." Don't be silent.

Interested in insects? See my insect photography tips.

Want to see more tips? Check back every Friday for a new post. Click here to follow me on Tumblr and here to follow me on Bloglovin! Don't forget you can also use the nifty sidebar to subscribe via email or RSS feed


Friday, May 9, 2014

Perspective & Photo Challenge

The Art of photography is just as much a challenge as the Skill of photography. Photography hangs in a strange world, a balance between the vision of the artist and the abilities of the equipment. This is another post about the Art of photography. (You can read my last post about the art of photography here.)

Little bug, big world
One of the struggles of artistic photography is to produce images that are more than just physical documentations of the subject. Sometimes this seems easy, but other times it can be more difficult. This begs the question:

How can I push myself to produce more artistic images?

There are, of course, many answers to this question. One thing I would suggest would be to determine what your goals as a photographer are. What are you trying to convey to the viewer? Are you trying to persuade them, amaze them, terrify them? Or are you trying to capture abstract emotions, melancholy, love, peace? It's up to you, but there's very little chance of achieving your goal if you don't have a clear idea of what it is.

So, besides having a "mission statement" for my work, what else can I do?

Photography is, of course, a visual art. Ergo you must force yourself to produce visually unique and captivating images - you will not be able to achieve your goal if no one wants to look at your work. 

Do this exercise.

I've mentioned this somewhere before, but a great trick to force yourself to expand your visual horizons is to constrain your subject matter. What does that mean? Simple: make yourself take 10 (or 5, or 15, or 20) different images of the same subject.

Dramatic backside view
Challenge yourself to think of different "themes" for each shot, and push yourself to demonstrate different aspects of your subject in each frame. This brief series I've done involves a Reduviid nymph (I believe it is a Wheel Bug but I cannot confirm this). Each picture is distinct in evoking emotion in the viewer, although they were all shot on the same morning, at the same location, of the same insect.

Detailed side view
When I look at these images together, they form a story (for me) about the Wheel Bug nymph. It's small, but is a ferocious predator (look at that vicious proboscis!), and is patterned beautifully. Other people probably look at them and think, "gross, that looks terrifying, why would anyone go near that thing???"

Well, to each her own. If you aren't that person alluded to above, you may want to check out my post on insect photography here.

What do you think about this challenge? Are you going to try it weekend? (If you do and  you upload your photos somewhere, feel free to leave a link in the comments. I'd love to see!)

Want to see more tips? Check back every Friday for a new post. Click here to follow me on Tumblr and here to follow me on Bloglovin! Don't forget you can also use the nifty sidebar to subscribe via email or RSS feed

By the way:


Friday, March 28, 2014

Spring Medly: Spring Nature Photography Tips

Spring Nature Photography

So, depending on where you live, it is either already Spring or just about to become Spring. The photographer's year restarts, flowers bloom, and suddenly even people who aren't nature photographers want to be outside. The calendar turns.

The return of warmer temperatures means that there is a flurry of animal activity happening, providing ample opportunity for even the off-season photographer to snag a few nature pics. But, let's be honest with each other - you probably aren't excited about producing the same trite images of daisies you captured when you first picked up a camera at age 12. Indeed, there is more to Spring nature photography than flower buds.

Think about the changing season.

Spring hasn't begun in earnest yet where you live? Good! A world in flux makes for interesting photographic opportunities. Here, dried winter leaves are rendered against a background of soft spring green. Strong golden backlighting brings more interest to the picture, evoking in the viewer a sense of sunrise, of the beginnings of spring.


Remember that with spring blooms come the animals that rely on them.

You didn't really think I was going to publish a post about spring without including photos of insects, right? While I love detailed macros of insect life (see my post here), spring gives an abundance of opportunity to capture insects interacting with their environments. 
Here you can see a bee sneaking nectar from the base of a flower.
There is a strong tendency in nature and macro photography to get as close as is physically possible to your subject. While this technique also produces stunning images, don't forget to add variety to your work by stepping back one in a while.
I particularly love the metallic blue of the insect against the pink flowers.
Try to incorporate contrasting colors into your photographs.

Spring is full of so many colors, it can become a bleary visual racket. If possible, make use of your color wheel and try to compose images with colors that belong to the same family. Or, be even more daring (ooh!) and combine contrasting colors to add spark to your images.

White-Lined Sphinx Moth
Here you can see how the rich purple of the flowers plays against the orange-red warning markings on the moth. This contrast makes both colors appear more vibrant to the viewer.

Ok- that's all I've got; it's your turn now! Is it spring where you live yet? What is your favorite thing to photograph in springtime?

You can read last year's post about Spring photography here.

If you want more, you can follow me here on Tumblr and here on Bloglovin', or subscribe via RSS feed or email by using the snazzy sidebar options. Check back here every Friday for a new post!


Friday, March 7, 2014

Under a Somber Sky: Lighting Tips


The morning greeted me with a chill silence, grey and damp. Clouds blanketed the sun and the heavy humidity stuck to my skin. I shivered and zipped up my sweater.
Today would be a great day for macros.


As photographers, we worship the light, chase it, cater to it, long for it. However we must not forget the utility of cloud cover. Clouds allow for soft, diffused light that coaxes the vibrancy from flower petals and greenery. In harsh daytime light, many of the subtle colors of flowers get washed out or overwhelmed by the sheer intensity of the light. Heavy cloud cover prevents this problem, allowing for brilliant portraits. 
Of course, with the heavy clouds overhead the problem of darkness follows - it may be too dim to get the fast shutter speeds needed for sharp images of quick-moving insects or birds. Thus, I mostly stick to shooting flowers in these circumstances - but that doesn't mean you have to.
Diffused lighting allows for the delicate color palette of this flower to be captured without the "bleaching" of the white petals produced by bright overhead sunshine
A morning with heavy cloud cover provides other opportunities as well. The lack of sunshine means that morning delicacies such as dew hang around longer, as the light needed to evaporate them is missing.
Here you can see not only the dewdrops, but how vibrantly the blue and yellow tones have been rendered.


Dew drops are always a treat to discover because they add another layer of detail to macro subjects. The layered textures in the above photograph create new interest in an image that otherwise would rely on color and composition only.

Finally, soft morning light allows for more detail to be rendered in textured subjects, versus harsh, overhead midday light. Strong noontime lighting will destroy the subtle shadows of fine textures, such as the veining on this leaf above. Note also the richness of the color tones afforded by the overcast lighting.

What do you think about photographing under cloud cover? What is your favorite kind of lighting? I talk about evening lighting in this post.
If you enjoyed this post, you can find me here on Tumblr or follow me here on Bloglovin'. In addition, you can utilize the snazzy sidebar items to subscribe via email or RSS feed. Check back every Friday for a new article!
Thanks for reading!