Showing posts with label camera. Show all posts

Friday, March 6, 2015

Under Your Feet: Abstract Winter Macro Photography

Hello all! I hope this post finds you well. Like I discussed in this post last year, winter nature photography can be difficult. I mean, who really wants to go outside when it's cold, right? Well, I hope to convince you that there are lots of great reasons to try macro photography in the winter.


Searching for Patterns

Snow and ice add interesting detail to nature. However, instead of always choosing to compose a typical winter landscape blanketed in snow, try focusing in on abstract patterns created by this strange precipitation.

The photo above is of an oak tree, frosted with snow. By zooming in on familiar objects, foreign and unusual topographies are revealed. This, of course, is the quest of the macro photographer - but you don't need a macro lens to achieve this. This photo above was taken with a standard kit lens, for example.

Ice Worship

I prefer ice to snow for winter macros. While snow covers detail, ice often accentuates it, creating strange bubbles and patterns on top of boring objects.


The way the ice emphasized the outlines of these twigs turns an utterly unremarkable composition into an intriguing image. 


Similarly here. The gravel peeking up above the ice layer adds another element of depth to the pattern.


Here, the contrast of the green grass with the icy winter feel of the rest of the photograph provides visual interest.

The theme with these winter ice macros is looking down. That is, I walked outside, looked around at my apartment complex in the ice, and then looked at my feet. I realized that I was standing on beautiful macro subjects that I had almost passed by, because I almost didn't look.

So, grab your camera, get outside, and don't forget to look at your feet every once in a while.

What's your favorite winter photography tip? Let me know in the comments!

Want to see more tips? Check back every Friday for a new post. Click here to follow me on Tumblr and here to follow me on Bloglovin! Don't forget you can also use the nifty sidebar to subscribe via email or RSS feed

Friday, February 27, 2015

Spring Interlude: Flower Photography Tips

Hello all! We've had a bit of warm weather down here in Texas, so spring flowers have already started blooming. I thought I would take the opportunity to talk a bit more about flower photography basics.


Let's get started.

Step One: Think about Focus

Flowers are complicated because they have lots of parts. Think about it: there are petals, leaves, stamens, and maybe even other features designed to attract pollinators. From a nature photography standpoint, these many pieces create a problem, because each exists in a different plane of focus. The pistils and stamens leap forward, leaves droop back toward the ground, and petals hover delicately in between. You can't really capture all of these elements in crisp focus in one frame - so what do you focus on?


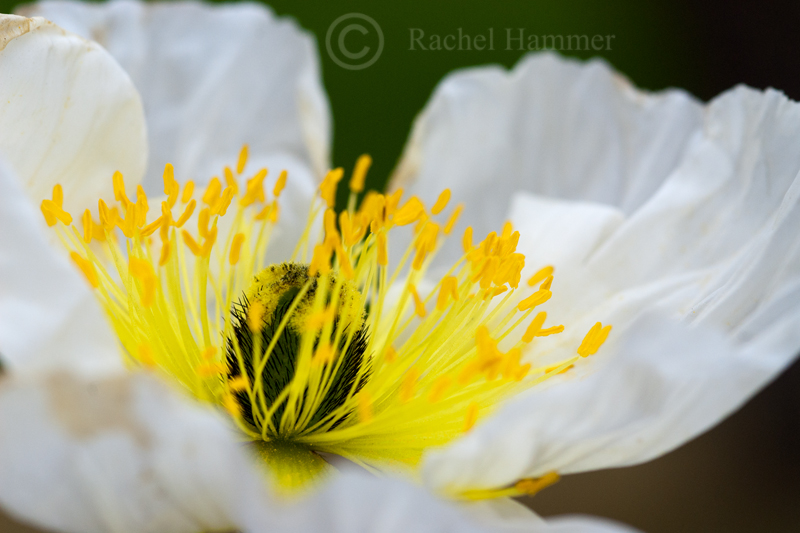
Take these two photos, for example. Which one do you like best? You can see that the focus is slightly different between them, with the second image focusing on the pistils closest to the viewer, rendering the center of the flower soft.

I actually prefer the first image, but I didn't know this while I was shooting. This brings me to my point about how to solve the focus problem - you should experiment in the field, taking different pictures of the same flower but changing your point of focus. Manual focus is very helpful for this.

Step Two: Corral a Composition

Flowers seem to pose one of two compositional problems for the photographer: they are either spectacularly, awkwardly alone, or are clumsily smashed together with many of their brethren. How do you address these problems?


The Awkward Loner

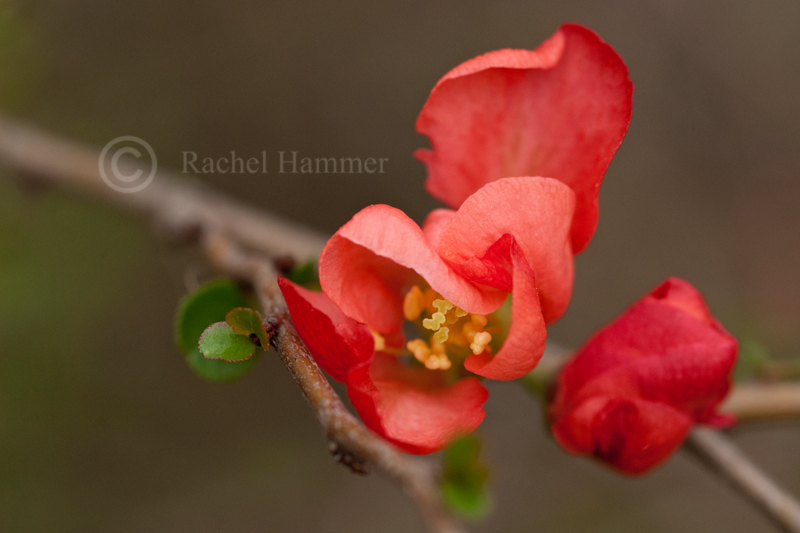
There are a couple ways to deal with the awkward loner. One method, as demonstrated in the photo above, is to include other elements of the plant in the picture. Here, the diagonal branch adds dynamic movement to a static picture of a red flower, alone. The small, green leaves lend contrast and extra detail that help situate the flower in its environment. In short, take a picture of the whole plant, rather than just the flower. This is also a good tip if you do not own macro equipment.

The other treatment the awkward loner often gets is demonstrated by the pictures I showed you earlier. Here, let's look at one again.


A frame-filling macro eliminates the clumsiness of a big flower on a tall, spindly stalk. The downside of this method is that it requires dedicated macro equipment.

The "Too Many Friends" Flower 

Ever try to take a group picture? How about a group picture of children? Then you already know what I'm talking about when I discuss the difficulty of achieving a coherent composition in group photos. Sometimes flowers grow in groups. They grow haphazardly, aggressively, each straining toward the sun in a different direction. It can be difficult to create a pleasing image in these circumstances.


There are a couple of things to consider:

1. Use depth of field to your advantage. You can see in the image above that the flowers in the background are in a different plane of focus from the subject flower. Thus they are softer and not as distracting.

2. Get closer. Crop distracting elements out of the frame, such as large leaves or flowers that are steadfastly not helping your composition.

3. Understand the motion of the picture. Flowers can be difficult to photograph because they are static and can become boring. A group of flowers can lend interest. Notice how the subject flower is pointing upward, while the background flowers are pointing down. This visual conflict simulates motion and encourages the viewer to keep looking.

All right! Those are my solutions to some of the biggest problems I struggle with in flower photography. Now it's your turn - what are some of your best tips for flower photography?

If you enjoyed this post, you can find me here on Tumblr or follow me here on Bloglovin'. In addition, you can utilize the snazzy sidebar items to subscribe via email or RSS feed. Check back every Friday for a new article!
Thanks for reading!

Friday, February 20, 2015

The (Only) 5 Things You Need to Start Nature Photography


This week I bring you...a list! That's right - we're going to talk about nature photography - what you need, and how to get started. Contrary to what you might think, you only need 5 things to start doing nature photography. So, read on to find out!

ITEM #1: ANY CAMERA

Many people falsely believe that they need tons of expensive equipment to get into nature photography. While it is true that some aspects of nature photography do require specialized equipment, all any beginner nature photographer needs is a camera.

It doesn't even have to be a DSLR.

Taken with the iPhone 5 + HDR


As I talk about here and here, you can even use your smartphone.

If you do have some disposable income, an entry-level DSLR is a worthy investment, but don't feel like you "need" to buy an expensive camera to take great pictures. You just don't -- and an expensive piece of equipment won't automatically guarantee beautiful works of art.

#2: A PLACE OUTSIDE

Another myth about nature photography is that it requires one to travel to exotic locales. And, again, if you have the time and money to travel to such places - go for it! But I don't. And you don't need to, either. Like I mention here, the only thing you need for nature photography is a little square of nature.


If you are willing to travel a little bit, there are many beautiful and wonderful state parks. A great resource is to google "your state" + "state parks." Many states have informative websites with maps and widgets that can help you find some lovely green space within a short drive of your house.

For example:


However, even your backyard (if you have one), can host a bevy of interesting creatures and plants. Don't neglect easily accessible areas because they seem unexciting - you never know what you might find!

Grasshopper Nymph spotted in the flower pot outside my apartment

#3: LIGHT

Light, as I discuss here, is very important for photography. You already know this. If you strip away complicated equipment and advanced techniques, the lighting of your subject matter becomes even more important. Luckily, lighting is free - it just takes a little extra effort for you to get up early in the morning (I know, I know).


See how the golden quality of the light on the trees makes them seem more alive? The dappling of the light also adds motion and interest to a still scene, as it encourages the viewer's eye to move around the frame.

This photograph was taken with no special equipment, aside from a DSLR. I used a simple "kit" lens that came with the camera when I bought it. I did not even use a tripod.

With the advances being made in smartphone cameras, they are more and more able to handle dappled lighting conditions like the one above. Additionally, HDR functionality improves their performance in situations with contrast-y lighting. So, in short: you can also use your smartphone, your point-and-shoot camera, whatever, to take images like these.

The keys to a good photograph are the same regardless of what camera you use: lighting, composition, subject matter.

#4: PHOTO EDITING SOFTWARE

Digital cameras are designed to produce low-contrast images so that detail is held in both the highlights and the shadows. However, this means that images usually come out of the camera needing some kind of tweaking. There are many programs you can use to edit your photography, some of which are free. I have a post here in which I detail my own image processing habits.

I usually edit photographs to look how I saw the scene in real life

Gimp is a very powerful free image editing program that mimics photoshop itself. For the iPhone, I personally like the Photoshop Express app (which is free). Picasa is another free editing tool that I haven't personally used.

For someone who is looking to spend a little bit of money, Photoshop Elements is a great program that should satisfy all of your editing desires.

#5: A TRIPOD

Okay, so this one is really a bonus item. You don't need a tripod, but it is a really handy tool to have. As you know, a tripod will stabilize your camera and prevent your shaky hands from blurring the image. 


Tripods become essential for wildlife photography that employs long telephoto lenses which magnify camera shake. However, they are also indispensable tools for the landscape photographer, evening/night photographer, and, really, anyone who can't hold a camera stable (me).

You can even find versions now for smartphones and small point-and-shoot cameras.

So, have you been inspired to start shooting nature images? What equipment do you like the best? Let me know in the comments!
Check back next Friday for the next installment of...TwoFeetPhoto. Please remember to share, follow, and subscribe via the fancy sidebar options! Here is my tumblr and here I am on bloglovin.


Friday, February 13, 2015

Photography Basics Part IV: What Lens is Good for What?

Hello hello! Thanks for tuning in to this week's episode of...TwoFeetPhoto. Today, we will be talking about camera equipment - namely, lenses. Which camera lenses do you need? What are they for? Eager to find out? Read on!

You may want to click here for links to my other Photography Basics articles.

First: a disclaimer about focal length. Most digital cameras, including the one I shoot with, are half sensor cameras. Because the image is recorded on a sensor that is half the size, there is an extra magnification factor. Thus, on half sensor cameras, the actual focal length of a lens is 1.5X what it says on the box. As a result, it can be difficult to get wide angle views on half sensor cameras because the effective focal length of a lens (unless it is designed specifically for a half sensor camera) is increased by half.

15mm - 100mm

Lenses in this range are best for landscape, architecture, and (human or pet) portraiture. Lenses at the low end of this range can produce wide angle "fisheye" effects, which may or may not be desirable.


Lenses like these are best for subjects that are large or not very far away; they have shorter focal lengths. These types of lenses do not suffer as much from motion blur because they do not have the magnification power of longer lenses.


100 - 200mm

This in-between lens length is generally best for large mammal photography, but can also be used for sports, travel, and landscape photography.


These lenses will not have enough magnification power to capture smaller or more flighty animals, such as birds. This is also the focal length at which you need to start worrying about motion blur, as the higher magnification power of the lens will also magnify unwanted movements of the camera. Remember, you should aim for your shutter speed to be greater than the focal length of your lens, or (better) use a tripod.

300mm - 600mm

This is animal photography range, including birds. Larger and less shy birds should be easy to photograph from 300, but if you are photographing animals that are very small or very far away, you will want to invest in the 600mm glass. Oh yeah, and you will need a tripod.


Lenses in the 300-400mm range make capturing portraits of larger birds and animals that are not timid reasonably easy.


These lenses have the magnification power to allow you to stand back and not frighten or disturb your subjects while still achieving pleasing images.

This image of baby egrets was captured with a 2x teleconverter stacked on top of a 300mm lens. Teleconverters come in different strengths and will increase the magnification power of your main lens, although they decrease the light available to the camera and can also degrade image quality. For smaller subjects like these, you will want a lens of at least 500mm.

Macro Lenses

There are different types of "special effect" lens available, of which I find the macro lens to be the best investment, particularly for the nature photographer. I have an entire post dedicated to macro photography, so you can head over here to read it if you're interested.

In short, macro lenses produce true close-up images, making them indispensable for those of us interested in small.


I hope this has demystified the many lens choices available for the photography consumer, and that it has helped you identify which lenses you actually need.

So, what is your favorite lens? Let me know in the comments below!
Want to see more tips? Check back every Friday for a new post. Click here to follow me on Tumblr and here to follow me on Bloglovin! Don't forget you can also use the nifty sidebar to subscribe via email or RSS feed.

Friday, August 15, 2014

Favorite Places: Volume II: Your Local Forest

For Volume I of My Favorite Places, click here.

So in this week's edition, I'm going to be talking about one of my favorite places for nature photography: forests.
Okay, okay, so that's not really a place. It's more correctly a habitat, I suppose. But I didn't want to make this post as narrow as the last edition of My Favorite Places, so, here we go.

The Wonder of the Forest


Forests are interesting places to explore for the nature photographer. Within, a wealth of different subjects abound. A sometimes overlooked element is landscape photography within forests. We often think of grand plains or impressive mountains when we hear "landscape." However, the forest holds a vast array of more subtle (or sometimes, more striking) landscapes to capture.


It can be a challenge to arrange the disorganized elements in a forestscape into a cohesive image. However, the landscape still features some strong stylistic elements. You will find yourself helped by the pattern of vertical lines created by tree trunks. Try picking a foreground element, in this case, a stream, to anchor your photo, and then allow the trees to do the rest of the work.
One thing you will need to watch out for is how the leaves will affect your white balance. Because landscapes like these can be overwhelmingly green, you may find your photos take on a funny, greeny-yellow color cast. Either adjust your white balance settings or tweak your images in photo editing software to take care of this.

Fowler's toad
Of course, forests are also full of wildlife. It is true that large mammals such as deer, bears, and foxes prowl the woodlands, but you are unlikely to see these animals usually. Don't despair, however. Forests are bursting with small creatures, eager to be subjects for your lens. Teach yourself to look downwards, and scour the paths for toads, insects, lizards, and other denizens of the woods. Like I've said before, don't be afraid to get your knees muddy to get the shot. Often, small creatures require you to shoot at their eye level to do them justice.

This box turtle looks as if I have personally offended him.
 You can see in this image the instant drama achieved by adjusting the camera angle to that of the turtle.

There are, of course, different types of forests, from boreal to tropical, each with its own wonders of natural history. But you don't have to travel great distances for great photography - fantastic animals are creeping their way through the leaves in your neighborhood (I promise).

All right, so have you been inspired? Or are you waiting for the winter freeze to kill all of the ticks before you venture outside? (I don't blame you.) Let me know in the comments.

Want to see more tips? Check back every Friday for a new post. Click here to follow me on Tumblr and here to follow me on Bloglovin! Don't forget you can also use the handy sidebar to subscribe via email or RSS feed.

Friday, August 1, 2014

A Brief Lesson in Photo Editing Using Photoshop Elements 9

This week I'll be discussing basic photo editing using adobe photoshop elements. I'm currently using an older version of elements, elements 9, so unfortunately this means that some of the commands won't be in the same locations as they are in different versions.

Why adobe doesn't standardize this, I don't know.

A quick overview: What is photoshop elements?

Photoshop elements is a "stripped down" version of photoshop that contains the basic commands needed for photo editing, but does not include the full range of editing options available in photoshop CS. Photoshop elements is sufficient for most hobbyists, while those seeking to take advantage of art and design features should turn to the full version of photoshop. Obviously, photoshop elements is much, much cheaper.

Okay, on to the tutorial!

Step 1: Cropping


Often times we may take a photo, but then decide later that the composition needs some work. That's where cropping comes in handy. Cropping can also be used to change the ratio of the image, making it easier to print (eg, by making it 4x6).
There are several ways to crop in photoshop. The way I find the easiest is to pick the rectangular marquee tool on the left toolbar, outlined in red. This will bring several options up at the top toolbar, which are also outlined in red. For cropping, you will want to change "feather" to "0". You can then adjust your ratio, should you desire. You can use no ratio, or "normal" mode, a fixed ratio, or a fixed size. I have mine set to a fixed ratio of 8x12, for easy printing.
The rectangular marquee changes your mouse to a cross, which you click and drag across the screen to create a rectangle. This rectangle can be moved after you make it. The area outside the rectangle will be cropped out. When you are satisfied, go to the "Image" menu across the top and select "crop."
Again, I apologize for using an old version; these items may not be in the same menus, so you may have to do a bit of hunting.

Step 2: Levels


To bring up the "Levels" tool quickly, simply press CTRL + L. You can also access it from the "enhance" menu, under "adjust lighting." The levels tool will allow you to adjust the exposure of your image.
You can see the histogram of your image in black. You also have 3 triangular pointers that you can adjust: they are coded black for shadows, gray for midtones, and white for highlights. If there is bare space in your histogram, you want to adjust the pointers to eliminate it. I have drawn in red arrows to demonstrate that I moved the white pointer left to where the histogram begins. Similarly, I moved the black pointer right. Let's see what that did.


I have zoomed in here so you can see a little better. Note the new positions of the pointers, as well as the enhanced brightness of the grasshopper.
You will notice that if you close and re-open the levels tool now, the histogram will look different.

Notice how it's broader? This is what you want.

Step 3: Shadows/Highlights

You can access the shadows/highlights tool by going to the Enhance > Adjust Lighting > Shadows/Highlights.


The first thing you may notice is that photoshop for some reason automatically drastically lightens your photo when you bring this toolbar up. To fix this, set "lighten shadows" back to 0 (or to wherever you'd like). You do this by dragging the little round marker left.
If you desire, you can also use this tool to "darken highlights," which does what it says, but I usually don't. I generally just spent step #2, levels, brightening my highlights, so I don't want to undo my hard work!
Finally, I select "midtone contrast" and increase that, usually to 7-10%, depending on the image. Again, just pick the little circle and drag it right. You can also manually type numbers into the percentage boxes.
*Make sure you have the "preview" box on the right checked so that your changes will automatically be applied to your image. 
When you are satisfied, click "ok".

Step 4: Duplicate Background Layer

Photoshop uses layers, and while you can do more with this in the full version of photoshop, layers make an appearance in photoshop elements as well. Layers allow you to do many things, including stacking effects, or altering one element of an image without changing another.
Here, we will use the layers tool because it makes our lives a little easier.


What we are going to do is make a copy of the "background." The background is the photo we've been working on - we are going to duplicate it so that we can edit it without worrying about making mistakes.
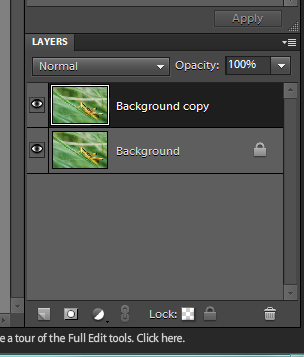
To duplicate the background, go to the "Layer" menu at the top, then select "duplicate layer." A box similar to the one shown above should pop up. Make sure it says "duplicate background" in the area I've boxed in red. Then, select "okay."

You'll notice in your lower right corner toolbar, you now suddenly have two pictures: One should say "background," while the other says "background copy." This is what you want. The little eye icon to the left of each layer determines whether or not the layer is visible. When it is unclicked, the eye will disappear, and the layer will become invisible.

Step 5: Adjust Color Curves

Curves is one feature that you have much more control over in full photoshop, but it exists in a simplified form in elements. To use this tool, go to: Enhance > Adjust Color > Adjust Color Curves.


A screen like this one should come up. You'll notice there is a "before" and "after" box on the left and right sides of the screen, respectively. This is why I've gone through the trouble of making a duplicate layer - I feel like it's impossible to actually see what you are doing on those tiny screens. With the duplicate layer, you can just overdo it and tone it down later - which is what I intend to do.

To use the Color Curves tool, you must select a style from the list on the bottom left. For basic editing, "default" is the best, but you can play with different styles to create different effects in your images. I have boxed "default" in red.

A graph will come up on the right but you can't actually do anything with it. It's mainly to remind you that adobe thinks you should really buy the full version of photoshop.

The primary thing we are interested in is the sliding toolbars in the center. You can use these to adjust the exposure and the color dynamics of your image. It can be a very powerful photo editing tool, but in elements, it's sort of "dumbed down." But it still works pretty well.

You'll want to adjust the sliders left or right, depending on your preference for your image. I generally increase both highlights and midtone brightness, and decrease midtone contrast and shadows. This tool is less intuitive than levels and requires a bit of tweaking and playing around with. However, because we have our background level copied, we can over-correct without worry.

Step 6: Adjust Layer Opacity

Okay, so now, if you're me, you've over-corrected your image to the point of ridiculousness, so we need to tone that back down.


Remember the layers toolbar I showed you earlier? At the top, there should be a box that says "opacity." I've highlighted it in red for you. Click on that box, and you should be able to adjust the opacity of your edited background copy. I've decreased mine to 45% here, but, again, the value will depend on your preference.
When you are satisfied, go to Layers > Flatten Layers, and you'll be back to having just one layer (your background).

Step 7: Finished Product

Enjoy!


What do you think? Do you use a photo editing program? How do you edit your images? Let me know below!

Did you see last week's article?


Check back next Friday for the next installment of...TwoFeetPhoto. Please remember to share, follow, and subscribe via the fancy sidebar options! Here is my tumblr and here I am on bloglovin.

Saturday, July 26, 2014

Summer: A Photo Essay

Hello! I am properly back this time, I promise. Weekly posting shall resume!

This week, I will be talking about summer nature photography and the concept of a photo essay.

A photo essay  is a series of images that documents an event or tells a story. We often associate photo essays with news photojournalism, but this does not mean they don't apply to nature photography.
What are the keys to a successful photo essay?

1. Set the scene.

In nature photography, we can become myopic about our subject matter. Close animal portraiture is nice, but does not provide any environmental context. A good photo essay should include other elements of the animal's habitat so the viewer can get a complete picture of the story.


By including both macro and scenic shots of the flower beds, I've also introduced some variety into my photographs. Now, the reader immediately has some idea of what this story is going to be about - we are outside, in a garden.

2. Introduce the main characters.

The key measure of success of a photo essay is whether not it portrays a clear story. This is easiest to achieve if you have an idea of what you want to convey before you begin shooting. My story, for example, is going to be about insect life in the heady summertime.


To simplify things a bit for the blog post (I never like to include too many photos - I feel like it becomes overwhelming), I've focused here on grasshoppers. Open, grassy areas are excellent spaces to hunt for grasshoppers, who aren't exactly the most elusive of insects. In addition, their large size makes them an accessible subject matter even to those without dedicated macro lenses. If you want some tips for insect photography, click here.

3. Subplot

If you are doing a series on an animal, it is a good idea to include different behaviors from that species, if possible. It adds more dimension to your story.


Here is a shot of a slant-faced grasshopper doing what grasshoppers do best: eat. Eating is always an interesting behavior to document.

4. Conclusion

This is the part we've been waiting for! What was the point of your story? What happens in the end? This is also the point at which you might urge the viewer to action, or force the viewer to make a decision.


We, of course, know what summer means to insects.

So, what do you think? Have you ever created a photo essay? Does yours include text, or is it only pictures? And do you think that this photo essay was successful? Let me know in the comments below!

Want to see more tips? Check back every Friday for a new post. Click here to follow me on Tumblr and here to follow me on Bloglovin! Don't forget you can also use the nifty sidebar to subscribe via email or RSS feed

Saturday, July 12, 2014

Special Effects: Advanced Photography Part II

I'm back - sorry for the delays!
Now, on to today's post. On this blog, I've mostly discussed traditional photography, emphasizing things like aperture, shutter speed, and composition. However, there are also special tricks and tips that one can employ to create unique images (without post-processing edits).

Click here to see Advanced Photography Part 1.

How to Use Shutter Speed to Create "Special Effects" with your Images

As discussed in my photography basics series, photographers adjust aperture and shutter speed to obtain accurate exposures. However, you don't have to do this. You can manipulate the shutter speed or aperture to achieve goals other than exposure.


Dreamlike exposures can be created by artificially prolonging the shutter speed and then moving the camera during the shot, producing unusual motion blur.  For this shot, I used a very slow shutter speed and a high aperture to compensate. You will need to experiment with different  exposure times to achieve the effect you desire without completely washing out your image. For each shot in this style that I like, I take about 10-15 "duds" - so keep trying different combinations.

f/32; shutter 1/8
Obviously, the longer the exposure and the more motion you create, the blurrier the end result will be. Compared the previous example, the example above is more painterly, with less detail preserved. This is due to the longer exposure.
Additionally, you should experiment not only with moving the camera body during the exposure, but also with zooming in and out with the lens.

What do you think about this technique? Have you tried it? Let me know in the comments.

Check back next Friday for the next installment of...TwoFeetPhoto. Please remember to share, follow, and subscribe via the fancy sidebar options! Here is my tumblr and here I am on bloglovin.

Friday, June 20, 2014

Shades of Gray: B&W Flower Photography

With the abundance of cheap/free photo-filtering software that's available now, black and white and sepia toned photography have experienced a popularity surge. But what makes a good black and white photograph? This week's episode of TwoFeetPhoto will be all about how to take great pictures of flowers - in black and white.

Black and White Flower Photography Basics

So what are some of the elements that go into a great black and white photograph? In this post, I talk about the three main elements that make up a good photograph: subject, lighting, and composition. It's no different for black and white photography, but, as ever, there are a few extra considerations.

1. Texture

Particularly with a subject like flowers, we are drawn promptly to color. Well, that's too bad, because this post is about black and white photography.


One of the keys to producing high-quality black and white photographs is to choose a subject with lots of texture. As one element is removed from the image (color), the others (texture, composition) become more prominent. Use this to your advantage, showcasing different aspects of your subject. Photographs of roses like this one, for example, are often odes to their deep red color. However, a black and white image allows the viewer to appreciate the delicacy of each petal, the unique way they fold together to form the whole flower. These details are often overlooked in color photography.

2. Contrast

I know I titled this post, "Shades of Gray," but that doesn't mean your photograph should be a big, gray blob. When shooting in black and white, you have to think about the tones in the image, and not simply the colors. Colors of the same tone will appear the same shade of gray once converted, leading to a boring, washed-out image.


Picking scenes that have more contrast will provide for stronger photographs. They will naturally have the variation of tones needed to create an interesting black and white image.

3. Lighting

Okay, so if you've been reading my blog, you should know by now that you always need to be paying attention to your lighting. However, it becomes even more important in black and white photography. Why? Like I've said above, black and white images remove a natural focal point from a scene - color. 


Stripped of color, your subject can appear drab and boring (so pick a high tonal contrast scene!). You'll want to ensure that your lighting enhances and does not detract from your subject. This could mean several things - as mentioned in #1, texture is an important element in black and white photography. So the harsh light you would normally want to avoid may become your friend. Harsh side lighting emphasizes texture differences in subjects. So, experiment with your lighting, like usual.


4. Simplify

Like we've been talking about, black and white photography obviously cannot rely on color to make an impact. This creates a separate problem, though -- that is, how does one separate the subject from the background? Normally color is a great clue, but that doesn't apply here. You don't want your subject to blend into the background because they are the same tone. So, a scene with tonal contrast is important (sensing a trend here?).


But it's also important to simply the image. This allows the subject to have a greater impact, making up for some of the oomph it might be lacking from its colorless appearance. Additionally, having a simple background lets the subject stand apart more strongly. You can see how the black background (converted in photoshop) in the above image lends the bloom even more power.

So, what do you think? Do you ever convert images to black and white, or are you a color-lover? Let me know in the comments.
Check back next Friday for the next installment of...TwoFeetPhoto. Please remember to share, follow, and subscribe via the fancy sidebar options! Here is my tumblr and here I am on bloglovin.