Showing posts with label art. Show all posts

Wednesday, May 6, 2015

Tidepooling in California & Some Updates

Hello all!

Thanks to all of you who have been reading along! I am sad to announce, if you had not noticed, that my posts will continue to be sporadic. Soon I will be starting my residency and won't have that much time for photography, let alone blogging. That being said, I will try to post when I have content. I will also be posting my images on 500px (you can find and follow my page here) so you can keep up with me that way.

In other news, I have re-opened my redbubble account (actually I just made a new account), so if you are interested in purchasing prints or gifts, you can do so here. If there's something that isn't available that you would like, feel free to message me!

All right, on to the tidepool critters.

Tidepools are something we don't really have in Florida, so I was excited to get a chance to explore some while visiting my friend in San Francisco.


The key thing with tidepooling is, of course, going at low tide. You'll want to check a tide chart before you head out, because higher tides will submerge the more interesting animals.


Be persistent and observant. Many tidepool animals, like this lined shore crab, are shy and are very sensitive to movement. If you wait (still) and watch, they may feel bold enough to scuttle out from their lairs, offering you the opportunity to capture their glory.

I would recommend a macro lens.


Here is another lined shore crab. Incorporating their habitat into the shot lends context and interest. Tidepools are pretty unique places, so there's no reason to leave them out of the shot!


All right, so this isn't pretty and it isn't a tidepool critter, but I thought it was interesting so I wanted to include it. Always keep an eye out for other subjects, even if you visit a locale with a particular shot in mind!

Okay, again, apologies for the continued sparse postings and brief postings, but life must go on.
 Please remember to share, follow, and subscribe via the fancy sidebar options! Here is my redbubble and my 500px.  Here is my tumblr and here I am on bloglovin.

Friday, March 6, 2015

Under Your Feet: Abstract Winter Macro Photography

Hello all! I hope this post finds you well. Like I discussed in this post last year, winter nature photography can be difficult. I mean, who really wants to go outside when it's cold, right? Well, I hope to convince you that there are lots of great reasons to try macro photography in the winter.


Searching for Patterns

Snow and ice add interesting detail to nature. However, instead of always choosing to compose a typical winter landscape blanketed in snow, try focusing in on abstract patterns created by this strange precipitation.

The photo above is of an oak tree, frosted with snow. By zooming in on familiar objects, foreign and unusual topographies are revealed. This, of course, is the quest of the macro photographer - but you don't need a macro lens to achieve this. This photo above was taken with a standard kit lens, for example.

Ice Worship

I prefer ice to snow for winter macros. While snow covers detail, ice often accentuates it, creating strange bubbles and patterns on top of boring objects.


The way the ice emphasized the outlines of these twigs turns an utterly unremarkable composition into an intriguing image. 


Similarly here. The gravel peeking up above the ice layer adds another element of depth to the pattern.


Here, the contrast of the green grass with the icy winter feel of the rest of the photograph provides visual interest.

The theme with these winter ice macros is looking down. That is, I walked outside, looked around at my apartment complex in the ice, and then looked at my feet. I realized that I was standing on beautiful macro subjects that I had almost passed by, because I almost didn't look.

So, grab your camera, get outside, and don't forget to look at your feet every once in a while.

What's your favorite winter photography tip? Let me know in the comments!

Want to see more tips? Check back every Friday for a new post. Click here to follow me on Tumblr and here to follow me on Bloglovin! Don't forget you can also use the nifty sidebar to subscribe via email or RSS feed

Friday, February 27, 2015

Spring Interlude: Flower Photography Tips

Hello all! We've had a bit of warm weather down here in Texas, so spring flowers have already started blooming. I thought I would take the opportunity to talk a bit more about flower photography basics.


Let's get started.

Step One: Think about Focus

Flowers are complicated because they have lots of parts. Think about it: there are petals, leaves, stamens, and maybe even other features designed to attract pollinators. From a nature photography standpoint, these many pieces create a problem, because each exists in a different plane of focus. The pistils and stamens leap forward, leaves droop back toward the ground, and petals hover delicately in between. You can't really capture all of these elements in crisp focus in one frame - so what do you focus on?


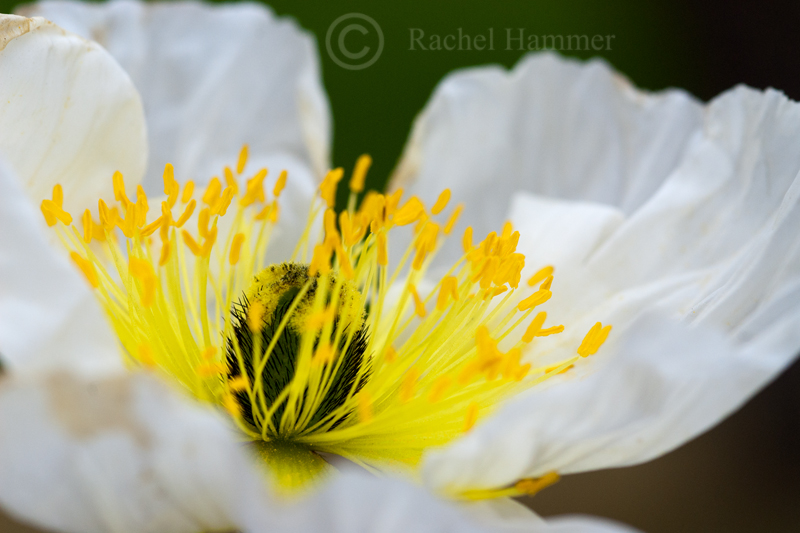
Take these two photos, for example. Which one do you like best? You can see that the focus is slightly different between them, with the second image focusing on the pistils closest to the viewer, rendering the center of the flower soft.

I actually prefer the first image, but I didn't know this while I was shooting. This brings me to my point about how to solve the focus problem - you should experiment in the field, taking different pictures of the same flower but changing your point of focus. Manual focus is very helpful for this.

Step Two: Corral a Composition

Flowers seem to pose one of two compositional problems for the photographer: they are either spectacularly, awkwardly alone, or are clumsily smashed together with many of their brethren. How do you address these problems?


The Awkward Loner

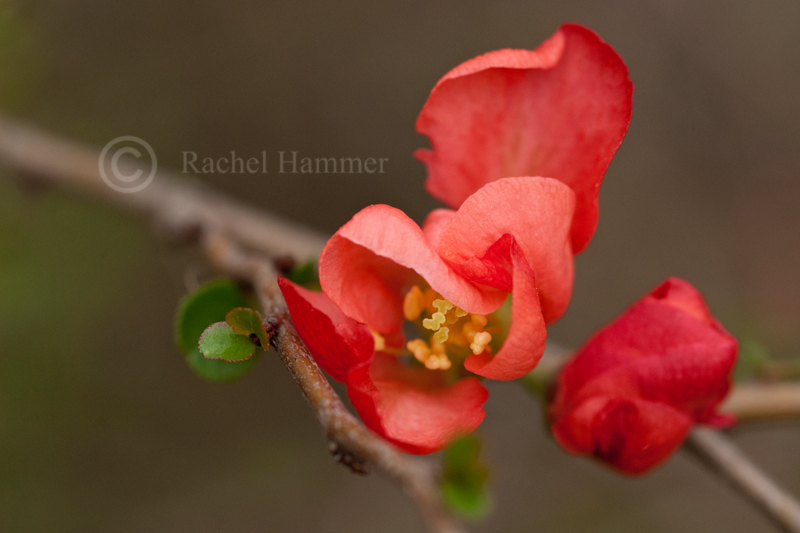
There are a couple ways to deal with the awkward loner. One method, as demonstrated in the photo above, is to include other elements of the plant in the picture. Here, the diagonal branch adds dynamic movement to a static picture of a red flower, alone. The small, green leaves lend contrast and extra detail that help situate the flower in its environment. In short, take a picture of the whole plant, rather than just the flower. This is also a good tip if you do not own macro equipment.

The other treatment the awkward loner often gets is demonstrated by the pictures I showed you earlier. Here, let's look at one again.


A frame-filling macro eliminates the clumsiness of a big flower on a tall, spindly stalk. The downside of this method is that it requires dedicated macro equipment.

The "Too Many Friends" Flower 

Ever try to take a group picture? How about a group picture of children? Then you already know what I'm talking about when I discuss the difficulty of achieving a coherent composition in group photos. Sometimes flowers grow in groups. They grow haphazardly, aggressively, each straining toward the sun in a different direction. It can be difficult to create a pleasing image in these circumstances.


There are a couple of things to consider:

1. Use depth of field to your advantage. You can see in the image above that the flowers in the background are in a different plane of focus from the subject flower. Thus they are softer and not as distracting.

2. Get closer. Crop distracting elements out of the frame, such as large leaves or flowers that are steadfastly not helping your composition.

3. Understand the motion of the picture. Flowers can be difficult to photograph because they are static and can become boring. A group of flowers can lend interest. Notice how the subject flower is pointing upward, while the background flowers are pointing down. This visual conflict simulates motion and encourages the viewer to keep looking.

All right! Those are my solutions to some of the biggest problems I struggle with in flower photography. Now it's your turn - what are some of your best tips for flower photography?

If you enjoyed this post, you can find me here on Tumblr or follow me here on Bloglovin'. In addition, you can utilize the snazzy sidebar items to subscribe via email or RSS feed. Check back every Friday for a new article!
Thanks for reading!

Friday, February 13, 2015

Photography Basics Part IV: What Lens is Good for What?

Hello hello! Thanks for tuning in to this week's episode of...TwoFeetPhoto. Today, we will be talking about camera equipment - namely, lenses. Which camera lenses do you need? What are they for? Eager to find out? Read on!

You may want to click here for links to my other Photography Basics articles.

First: a disclaimer about focal length. Most digital cameras, including the one I shoot with, are half sensor cameras. Because the image is recorded on a sensor that is half the size, there is an extra magnification factor. Thus, on half sensor cameras, the actual focal length of a lens is 1.5X what it says on the box. As a result, it can be difficult to get wide angle views on half sensor cameras because the effective focal length of a lens (unless it is designed specifically for a half sensor camera) is increased by half.

15mm - 100mm

Lenses in this range are best for landscape, architecture, and (human or pet) portraiture. Lenses at the low end of this range can produce wide angle "fisheye" effects, which may or may not be desirable.


Lenses like these are best for subjects that are large or not very far away; they have shorter focal lengths. These types of lenses do not suffer as much from motion blur because they do not have the magnification power of longer lenses.


100 - 200mm

This in-between lens length is generally best for large mammal photography, but can also be used for sports, travel, and landscape photography.


These lenses will not have enough magnification power to capture smaller or more flighty animals, such as birds. This is also the focal length at which you need to start worrying about motion blur, as the higher magnification power of the lens will also magnify unwanted movements of the camera. Remember, you should aim for your shutter speed to be greater than the focal length of your lens, or (better) use a tripod.

300mm - 600mm

This is animal photography range, including birds. Larger and less shy birds should be easy to photograph from 300, but if you are photographing animals that are very small or very far away, you will want to invest in the 600mm glass. Oh yeah, and you will need a tripod.


Lenses in the 300-400mm range make capturing portraits of larger birds and animals that are not timid reasonably easy.


These lenses have the magnification power to allow you to stand back and not frighten or disturb your subjects while still achieving pleasing images.

This image of baby egrets was captured with a 2x teleconverter stacked on top of a 300mm lens. Teleconverters come in different strengths and will increase the magnification power of your main lens, although they decrease the light available to the camera and can also degrade image quality. For smaller subjects like these, you will want a lens of at least 500mm.

Macro Lenses

There are different types of "special effect" lens available, of which I find the macro lens to be the best investment, particularly for the nature photographer. I have an entire post dedicated to macro photography, so you can head over here to read it if you're interested.

In short, macro lenses produce true close-up images, making them indispensable for those of us interested in small.


I hope this has demystified the many lens choices available for the photography consumer, and that it has helped you identify which lenses you actually need.

So, what is your favorite lens? Let me know in the comments below!
Want to see more tips? Check back every Friday for a new post. Click here to follow me on Tumblr and here to follow me on Bloglovin! Don't forget you can also use the nifty sidebar to subscribe via email or RSS feed.

Friday, February 6, 2015

Let's Go to the Beach! Beach Photography

Hello all! Are you one for relaxing on the beach while snowstorms bury the northeast? Well, I have the February post for you! Beaches can be excellent venues for nature photography, particularly in the winter. So pack your sunglasses and grab your tripod - we're going to learn how to improve your beach and vacation nature photography.

Beach Photography


Lover's Key - Ft. Myers, FL

Beaches provide unique challenges for the nature photographer, but they can be birding and wildlife hotspots, as well as excellent landscape subjects. So what are some tips for shooting on the beach?

Lighting, Lighting, Lighting

Beaches can be harsh. The lack of other land formations and trees to break up the sunlight means that unflattering, blinding overhead light is often a reality. For shooting at the beach, the time of day becomes even more important for this reason. You will find it difficult to capture any pleasing images if you show up midday (although this is probably the best time to get a tan). Evening and early morning light are really essential for successful beach photography.You will notice the beginnings of the sunset in the picture above. The softening light allows detail to be captured in the shore, while the colors add visual interest to the sky. You can read more about lighting here.

Lover's Key

Of course, the uninterrupted view of the sky makes beaches excellent for photographing unusual clouds and sunsets.

Pay Attention to the Tide

Low tide is the best time to be at the beach. It's when the water is the lowest, shells are exposed, and the most wildlife comes around to see what they can snag. You can find tide charts online - just give it a quick google, and try to plan your trip accordingly.


Ruddy Turnstone, Anastasia State Park
You will find many more shorebirds and waders if you plan your trip around low tide, but you may have to sacrifice lighting quality. Here, you can see the long shadows cast by the harsh lighting. Careful exposure is required to ensure that birds with variegated feather patters, like this turnstone, are not over- or under-exposed. You may want to read about exposure compensation here.

Introduce Landscape Features to Ground Images

Like I discussed in last week's episode, including foreground, midground, and background elements can strengthen compositions. I mentioned that this was especially important for landscape photography, and beach images are no different.

Sand Dunes, Lover's Key
 Here, the sand dunes making up the foreground provide visual interest and guide the viewer's eye back towards the ocean and sky. Turning your lens away from the shoreline itself and back towards scrubland and sand dunes also provides for unusual, often overlooked, beach landscapes.

Pedestrian bridge to Lover's Key beach
 Here, I have chosen to photograph the surrounding habitat rather the beach itself. The bridge provides visual interest in the composition. Evening light is starting to turn the sky purple and pink, and is casting a warmer glow over the vegetation. Paying attention to lighting condition can take a mediocre image into an excellent one.

In short, beaches can be nature photography bonanzas - and you don't even have to stick to the same, tired sunset and shoreline images. So, what do you think? Are you planning a winter beach trip anytime soon? Let me know in the comments.

Check back next Friday for the next installment of...TwoFeetPhoto. Please remember to share, follow, and subscribe via the fancy sidebar options! Here is my tumblr and here I am on bloglovin.

Friday, August 15, 2014

Favorite Places: Volume II: Your Local Forest

For Volume I of My Favorite Places, click here.

So in this week's edition, I'm going to be talking about one of my favorite places for nature photography: forests.
Okay, okay, so that's not really a place. It's more correctly a habitat, I suppose. But I didn't want to make this post as narrow as the last edition of My Favorite Places, so, here we go.

The Wonder of the Forest


Forests are interesting places to explore for the nature photographer. Within, a wealth of different subjects abound. A sometimes overlooked element is landscape photography within forests. We often think of grand plains or impressive mountains when we hear "landscape." However, the forest holds a vast array of more subtle (or sometimes, more striking) landscapes to capture.


It can be a challenge to arrange the disorganized elements in a forestscape into a cohesive image. However, the landscape still features some strong stylistic elements. You will find yourself helped by the pattern of vertical lines created by tree trunks. Try picking a foreground element, in this case, a stream, to anchor your photo, and then allow the trees to do the rest of the work.
One thing you will need to watch out for is how the leaves will affect your white balance. Because landscapes like these can be overwhelmingly green, you may find your photos take on a funny, greeny-yellow color cast. Either adjust your white balance settings or tweak your images in photo editing software to take care of this.

Fowler's toad
Of course, forests are also full of wildlife. It is true that large mammals such as deer, bears, and foxes prowl the woodlands, but you are unlikely to see these animals usually. Don't despair, however. Forests are bursting with small creatures, eager to be subjects for your lens. Teach yourself to look downwards, and scour the paths for toads, insects, lizards, and other denizens of the woods. Like I've said before, don't be afraid to get your knees muddy to get the shot. Often, small creatures require you to shoot at their eye level to do them justice.

This box turtle looks as if I have personally offended him.
 You can see in this image the instant drama achieved by adjusting the camera angle to that of the turtle.

There are, of course, different types of forests, from boreal to tropical, each with its own wonders of natural history. But you don't have to travel great distances for great photography - fantastic animals are creeping their way through the leaves in your neighborhood (I promise).

All right, so have you been inspired? Or are you waiting for the winter freeze to kill all of the ticks before you venture outside? (I don't blame you.) Let me know in the comments.

Want to see more tips? Check back every Friday for a new post. Click here to follow me on Tumblr and here to follow me on Bloglovin! Don't forget you can also use the handy sidebar to subscribe via email or RSS feed.

Saturday, July 26, 2014

Summer: A Photo Essay

Hello! I am properly back this time, I promise. Weekly posting shall resume!

This week, I will be talking about summer nature photography and the concept of a photo essay.

A photo essay  is a series of images that documents an event or tells a story. We often associate photo essays with news photojournalism, but this does not mean they don't apply to nature photography.
What are the keys to a successful photo essay?

1. Set the scene.

In nature photography, we can become myopic about our subject matter. Close animal portraiture is nice, but does not provide any environmental context. A good photo essay should include other elements of the animal's habitat so the viewer can get a complete picture of the story.


By including both macro and scenic shots of the flower beds, I've also introduced some variety into my photographs. Now, the reader immediately has some idea of what this story is going to be about - we are outside, in a garden.

2. Introduce the main characters.

The key measure of success of a photo essay is whether not it portrays a clear story. This is easiest to achieve if you have an idea of what you want to convey before you begin shooting. My story, for example, is going to be about insect life in the heady summertime.


To simplify things a bit for the blog post (I never like to include too many photos - I feel like it becomes overwhelming), I've focused here on grasshoppers. Open, grassy areas are excellent spaces to hunt for grasshoppers, who aren't exactly the most elusive of insects. In addition, their large size makes them an accessible subject matter even to those without dedicated macro lenses. If you want some tips for insect photography, click here.

3. Subplot

If you are doing a series on an animal, it is a good idea to include different behaviors from that species, if possible. It adds more dimension to your story.


Here is a shot of a slant-faced grasshopper doing what grasshoppers do best: eat. Eating is always an interesting behavior to document.

4. Conclusion

This is the part we've been waiting for! What was the point of your story? What happens in the end? This is also the point at which you might urge the viewer to action, or force the viewer to make a decision.


We, of course, know what summer means to insects.

So, what do you think? Have you ever created a photo essay? Does yours include text, or is it only pictures? And do you think that this photo essay was successful? Let me know in the comments below!

Want to see more tips? Check back every Friday for a new post. Click here to follow me on Tumblr and here to follow me on Bloglovin! Don't forget you can also use the nifty sidebar to subscribe via email or RSS feed

Friday, June 20, 2014

Shades of Gray: B&W Flower Photography

With the abundance of cheap/free photo-filtering software that's available now, black and white and sepia toned photography have experienced a popularity surge. But what makes a good black and white photograph? This week's episode of TwoFeetPhoto will be all about how to take great pictures of flowers - in black and white.

Black and White Flower Photography Basics

So what are some of the elements that go into a great black and white photograph? In this post, I talk about the three main elements that make up a good photograph: subject, lighting, and composition. It's no different for black and white photography, but, as ever, there are a few extra considerations.

1. Texture

Particularly with a subject like flowers, we are drawn promptly to color. Well, that's too bad, because this post is about black and white photography.


One of the keys to producing high-quality black and white photographs is to choose a subject with lots of texture. As one element is removed from the image (color), the others (texture, composition) become more prominent. Use this to your advantage, showcasing different aspects of your subject. Photographs of roses like this one, for example, are often odes to their deep red color. However, a black and white image allows the viewer to appreciate the delicacy of each petal, the unique way they fold together to form the whole flower. These details are often overlooked in color photography.

2. Contrast

I know I titled this post, "Shades of Gray," but that doesn't mean your photograph should be a big, gray blob. When shooting in black and white, you have to think about the tones in the image, and not simply the colors. Colors of the same tone will appear the same shade of gray once converted, leading to a boring, washed-out image.


Picking scenes that have more contrast will provide for stronger photographs. They will naturally have the variation of tones needed to create an interesting black and white image.

3. Lighting

Okay, so if you've been reading my blog, you should know by now that you always need to be paying attention to your lighting. However, it becomes even more important in black and white photography. Why? Like I've said above, black and white images remove a natural focal point from a scene - color. 


Stripped of color, your subject can appear drab and boring (so pick a high tonal contrast scene!). You'll want to ensure that your lighting enhances and does not detract from your subject. This could mean several things - as mentioned in #1, texture is an important element in black and white photography. So the harsh light you would normally want to avoid may become your friend. Harsh side lighting emphasizes texture differences in subjects. So, experiment with your lighting, like usual.


4. Simplify

Like we've been talking about, black and white photography obviously cannot rely on color to make an impact. This creates a separate problem, though -- that is, how does one separate the subject from the background? Normally color is a great clue, but that doesn't apply here. You don't want your subject to blend into the background because they are the same tone. So, a scene with tonal contrast is important (sensing a trend here?).


But it's also important to simply the image. This allows the subject to have a greater impact, making up for some of the oomph it might be lacking from its colorless appearance. Additionally, having a simple background lets the subject stand apart more strongly. You can see how the black background (converted in photoshop) in the above image lends the bloom even more power.

So, what do you think? Do you ever convert images to black and white, or are you a color-lover? Let me know in the comments.
Check back next Friday for the next installment of...TwoFeetPhoto. Please remember to share, follow, and subscribe via the fancy sidebar options! Here is my tumblr and here I am on bloglovin.


Friday, June 13, 2014

Small Considerations, Creative Photography Tips, and More Wheelbug Photos

Creative Photography Tips

Surprise surprise, I'm back again! This week I'll be talking a bit more about achieving creative insect photographs.
So if you don't like bugs, look away. Because I do. (If you missed it, this article also talks about improving the artistic elements of your photography.)
Wheelbug nymph, late instar

1. See Eye to Eye
Like I've talked about previously in my article, "How to take Great Pet Photographs with a Smart Phone," perspective is important in photography. Particularly when photographing subjects that are shorter than you, it's important to bend down and shoot at eye level. The last time I checked, most insects are shorter than even me, so getting your knees dirty is important here. 
The subject's eye, in clear focus, in a photograph allows the viewer to make "eye contact," and thus feel more connected to or invested in the photograph. If you don't believe me, try it. Do a google search for animal photography. Are you more attracted to photos in which you can clearly see the animal's eyes, or not?

Wheel Bug, late instar nymph
2. Know your diagonals

This is a trick I often see portrait photographers use. To make a static shot more dynamic, tilt your camera and shoot at an angle. The strong diagonal line of the wooden railing in this shot adds drama and movement to a photo that is, quite frankly, otherwise quite boring. The new angle forces the viewer's brain to reevaluate the subject and examine it more closely, resulting in a viewer who is much more engaged with your work.
Also notice here the eye contact the insect is making with the viewer.

Yup, more wheel bugs

3. Patience is a virtue

Particularly in nature photography, some of the most striking images come from simply waiting until something fantastic happens. I followed several of these nymphs along wooden railings through a forested area of a local park. Finally, this scene happened. If you've ever watched a wheel bug, you know that they have quite interesting behaviors. When threatened, they rear up on their hind legs and splay their front two legs out. These two guys (girls?) ran into one another and got startled.
I used the flash in this photo because I realized that I needed a fast shutter speed to freeze the action of the two insects in the setting of the dim woods. As a downside, you can see the "flattening" effect the flash has on subjects - which is why I don't normally use it.

So, what do you think? Will you try any of these tips?

If you enjoyed this post, you can find me here on Tumblr or follow me here on Bloglovin'. In addition, you can utilize the snazzy sidebar items to subscribe via email or RSS feed. Check back every Friday for a new article!
Thanks for reading!

Friday, June 6, 2014

Pluses and Minuses: Exposure Compensation (Advanced Photography Part 1)

Advanced Photography Part 1: Exposure Compensation

So, you've read all of my Photography Basics series, but want more? Well, I'm here to help. This week's topic will be exposure compensation.

What is exposure compensation?
Exposure compensation is a feature you should find on most "pro-sumer" and advanced digital and film cameras. It allows you to make manual adjustments to the exposure time, separate from the aperture and shutter speed adjustments.

The button usually looks something like this:


Exposure compensation will allow you to either add or subtract time from an exposure. Usually, the increments are -0.3, -0.7, -1, 0, +0.3, +.07, +1, etc. The negative values shorten the exposure time (decrease light, increase shutter speed), while the positive values will lengthen the exposure time (more light, slower shutter). Make sense?

Okay, so when would I want to use exposure compensation?

Advanced digital cameras have complicated computers inside of them that calculate the exposure for us, eliminating the need for manual calculations for each shot. However, sometimes these computers make errors - and exposure compensation can be used to correct them. It also can be used to achieve different artistic effects in images.


White or Black Subjects

Many automatic exposure calculators have difficulty with white or black subjects, such as these egret chicks. All-white subjects, particularly against darker backgrounds, are often overexposed by automatic readings. This means you may end up with a completely white subject - not desirable. In this situation, you will want to decrease the total exposure - reducing the light and allowing detail to be rendered properly in your subject. You can use exposure compensation to do this. You will probably want to take several shots - a few with no compensation, a few with -0.3, some with -0.7, etc, depending on how bright it is. This is called bracketing your exposure, and some cameras can even be set to do it automatically. 

Sloth Bears

For very dark or black subjects, the opposite tends to be true. In-camera exposure calculators will tend to underexpose the image, resulting in an entirely black subject. Increase your exposure (positive exposure compensation) to avoid this problem.

Owlfly

Backlit Subjects

Backlit subjects suffer from being a relatively dark object in a relatively bright field. The exposure meter will be fooled by this, recognizing the overwhelmingly bright scene instead of your intended subject. This can produce a very underexposed subject. To remedy this, try bracketing your exposure upwards - ie, positive exposure compensation. Alternatively, if you want to silhouette your subject against a brilliant background (perhaps a sunset?), bracketing down (negative exposure compensation) will help you.


Strongly Illuminated Subjects

Subjects with very bright lighting may also benefit from bracketing down of your exposure. Taking multiple shots with different exposure settings is the key to achieving the perfect exposure in difficult lighting.

So, have you ever used the exposure compensation setting on your camera? Do you use automatic bracketing? Let me know!

Did you see last week's post on why you should always bring your camera?

Want to see more tips? Check back every Friday for a new post. Click here to follow me on Tumblr and here to follow me on Bloglovin! Don't forget you can also use the nifty sidebar to subscribe via email or RSS feed


Friday, May 30, 2014

Little Surprises (Or, why you should always take your camera)

The first problem of photography is locating your subject - and that's what this week's post is about.

As much as is reasonably possible, you should always try to carry your camera with you.

This is because opportunities have a nasty tendency of popping up when you least expect them. A walk around your apartment complex suddenly becomes a photo session; you spy an unusual bird in the walmart parking lot (this has happened to me); your friend brings her adorable puppy to a party, etc. All of these situations make for great photography, but not if you don't have your camera.

Late instar grasshopper

This is the guiding principle of street photography, but we hardly think of it for nature photography. It's as if "nature" has retreated to its own little place in the world, and we can't encounter it unless we go specifically looking. Well, I contend that this is a false notion. Due to encroachment and habitat loss, urban wildlife are becoming more adaptable and more common.

Grasshopper nymph

Of course, as you shouldn't be surprised to hear at this point, insects are the queens of urban animal life. Small and highly adaptable, insect species flourish where other animals are unable to survive. This means that there is likely a whole safari of creatures waiting outside your front door.

...Have you gone to look yet?

Grasshopper nymph

 I wanted to highlight these little grasshopper nymph pictures because I took them in a flower pot outside my apartment door. To clarify, it's not a garden; it's a single flower pot. And it's not even my flower pot. Having my camera on hand whenever I go outside allows me to capture unexpected critters like these. And hey, they look pretty cool, right?

So how about you? Are you glued to your camera, or do you tend to leave it at home?
Insects not your thing? Check out my article on bird photography.

Want to see more tips? Check back every Friday for a new post. Click here to follow me on Tumblr and here to follow me on Bloglovin! Don't forget you can also use the handy sidebar to subscribe via email or RSS feed.