Showing posts with label diy. Show all posts

Friday, March 6, 2015

Under Your Feet: Abstract Winter Macro Photography

Hello all! I hope this post finds you well. Like I discussed in this post last year, winter nature photography can be difficult. I mean, who really wants to go outside when it's cold, right? Well, I hope to convince you that there are lots of great reasons to try macro photography in the winter.


Searching for Patterns

Snow and ice add interesting detail to nature. However, instead of always choosing to compose a typical winter landscape blanketed in snow, try focusing in on abstract patterns created by this strange precipitation.

The photo above is of an oak tree, frosted with snow. By zooming in on familiar objects, foreign and unusual topographies are revealed. This, of course, is the quest of the macro photographer - but you don't need a macro lens to achieve this. This photo above was taken with a standard kit lens, for example.

Ice Worship

I prefer ice to snow for winter macros. While snow covers detail, ice often accentuates it, creating strange bubbles and patterns on top of boring objects.


The way the ice emphasized the outlines of these twigs turns an utterly unremarkable composition into an intriguing image. 


Similarly here. The gravel peeking up above the ice layer adds another element of depth to the pattern.


Here, the contrast of the green grass with the icy winter feel of the rest of the photograph provides visual interest.

The theme with these winter ice macros is looking down. That is, I walked outside, looked around at my apartment complex in the ice, and then looked at my feet. I realized that I was standing on beautiful macro subjects that I had almost passed by, because I almost didn't look.

So, grab your camera, get outside, and don't forget to look at your feet every once in a while.

What's your favorite winter photography tip? Let me know in the comments!

Want to see more tips? Check back every Friday for a new post. Click here to follow me on Tumblr and here to follow me on Bloglovin! Don't forget you can also use the nifty sidebar to subscribe via email or RSS feed

Friday, August 1, 2014

A Brief Lesson in Photo Editing Using Photoshop Elements 9

This week I'll be discussing basic photo editing using adobe photoshop elements. I'm currently using an older version of elements, elements 9, so unfortunately this means that some of the commands won't be in the same locations as they are in different versions.

Why adobe doesn't standardize this, I don't know.

A quick overview: What is photoshop elements?

Photoshop elements is a "stripped down" version of photoshop that contains the basic commands needed for photo editing, but does not include the full range of editing options available in photoshop CS. Photoshop elements is sufficient for most hobbyists, while those seeking to take advantage of art and design features should turn to the full version of photoshop. Obviously, photoshop elements is much, much cheaper.

Okay, on to the tutorial!

Step 1: Cropping


Often times we may take a photo, but then decide later that the composition needs some work. That's where cropping comes in handy. Cropping can also be used to change the ratio of the image, making it easier to print (eg, by making it 4x6).
There are several ways to crop in photoshop. The way I find the easiest is to pick the rectangular marquee tool on the left toolbar, outlined in red. This will bring several options up at the top toolbar, which are also outlined in red. For cropping, you will want to change "feather" to "0". You can then adjust your ratio, should you desire. You can use no ratio, or "normal" mode, a fixed ratio, or a fixed size. I have mine set to a fixed ratio of 8x12, for easy printing.
The rectangular marquee changes your mouse to a cross, which you click and drag across the screen to create a rectangle. This rectangle can be moved after you make it. The area outside the rectangle will be cropped out. When you are satisfied, go to the "Image" menu across the top and select "crop."
Again, I apologize for using an old version; these items may not be in the same menus, so you may have to do a bit of hunting.

Step 2: Levels


To bring up the "Levels" tool quickly, simply press CTRL + L. You can also access it from the "enhance" menu, under "adjust lighting." The levels tool will allow you to adjust the exposure of your image.
You can see the histogram of your image in black. You also have 3 triangular pointers that you can adjust: they are coded black for shadows, gray for midtones, and white for highlights. If there is bare space in your histogram, you want to adjust the pointers to eliminate it. I have drawn in red arrows to demonstrate that I moved the white pointer left to where the histogram begins. Similarly, I moved the black pointer right. Let's see what that did.


I have zoomed in here so you can see a little better. Note the new positions of the pointers, as well as the enhanced brightness of the grasshopper.
You will notice that if you close and re-open the levels tool now, the histogram will look different.

Notice how it's broader? This is what you want.

Step 3: Shadows/Highlights

You can access the shadows/highlights tool by going to the Enhance > Adjust Lighting > Shadows/Highlights.


The first thing you may notice is that photoshop for some reason automatically drastically lightens your photo when you bring this toolbar up. To fix this, set "lighten shadows" back to 0 (or to wherever you'd like). You do this by dragging the little round marker left.
If you desire, you can also use this tool to "darken highlights," which does what it says, but I usually don't. I generally just spent step #2, levels, brightening my highlights, so I don't want to undo my hard work!
Finally, I select "midtone contrast" and increase that, usually to 7-10%, depending on the image. Again, just pick the little circle and drag it right. You can also manually type numbers into the percentage boxes.
*Make sure you have the "preview" box on the right checked so that your changes will automatically be applied to your image. 
When you are satisfied, click "ok".

Step 4: Duplicate Background Layer

Photoshop uses layers, and while you can do more with this in the full version of photoshop, layers make an appearance in photoshop elements as well. Layers allow you to do many things, including stacking effects, or altering one element of an image without changing another.
Here, we will use the layers tool because it makes our lives a little easier.


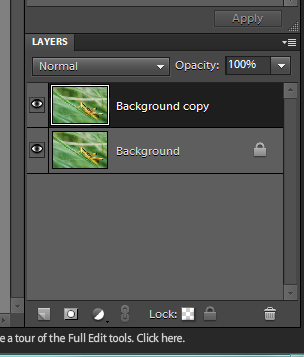
What we are going to do is make a copy of the "background." The background is the photo we've been working on - we are going to duplicate it so that we can edit it without worrying about making mistakes.
To duplicate the background, go to the "Layer" menu at the top, then select "duplicate layer." A box similar to the one shown above should pop up. Make sure it says "duplicate background" in the area I've boxed in red. Then, select "okay."

You'll notice in your lower right corner toolbar, you now suddenly have two pictures: One should say "background," while the other says "background copy." This is what you want. The little eye icon to the left of each layer determines whether or not the layer is visible. When it is unclicked, the eye will disappear, and the layer will become invisible.

Step 5: Adjust Color Curves

Curves is one feature that you have much more control over in full photoshop, but it exists in a simplified form in elements. To use this tool, go to: Enhance > Adjust Color > Adjust Color Curves.


A screen like this one should come up. You'll notice there is a "before" and "after" box on the left and right sides of the screen, respectively. This is why I've gone through the trouble of making a duplicate layer - I feel like it's impossible to actually see what you are doing on those tiny screens. With the duplicate layer, you can just overdo it and tone it down later - which is what I intend to do.

To use the Color Curves tool, you must select a style from the list on the bottom left. For basic editing, "default" is the best, but you can play with different styles to create different effects in your images. I have boxed "default" in red.

A graph will come up on the right but you can't actually do anything with it. It's mainly to remind you that adobe thinks you should really buy the full version of photoshop.

The primary thing we are interested in is the sliding toolbars in the center. You can use these to adjust the exposure and the color dynamics of your image. It can be a very powerful photo editing tool, but in elements, it's sort of "dumbed down." But it still works pretty well.

You'll want to adjust the sliders left or right, depending on your preference for your image. I generally increase both highlights and midtone brightness, and decrease midtone contrast and shadows. This tool is less intuitive than levels and requires a bit of tweaking and playing around with. However, because we have our background level copied, we can over-correct without worry.

Step 6: Adjust Layer Opacity

Okay, so now, if you're me, you've over-corrected your image to the point of ridiculousness, so we need to tone that back down.


Remember the layers toolbar I showed you earlier? At the top, there should be a box that says "opacity." I've highlighted it in red for you. Click on that box, and you should be able to adjust the opacity of your edited background copy. I've decreased mine to 45% here, but, again, the value will depend on your preference.
When you are satisfied, go to Layers > Flatten Layers, and you'll be back to having just one layer (your background).

Step 7: Finished Product

Enjoy!


What do you think? Do you use a photo editing program? How do you edit your images? Let me know below!

Did you see last week's article?


Check back next Friday for the next installment of...TwoFeetPhoto. Please remember to share, follow, and subscribe via the fancy sidebar options! Here is my tumblr and here I am on bloglovin.

Friday, May 30, 2014

Little Surprises (Or, why you should always take your camera)

The first problem of photography is locating your subject - and that's what this week's post is about.

As much as is reasonably possible, you should always try to carry your camera with you.

This is because opportunities have a nasty tendency of popping up when you least expect them. A walk around your apartment complex suddenly becomes a photo session; you spy an unusual bird in the walmart parking lot (this has happened to me); your friend brings her adorable puppy to a party, etc. All of these situations make for great photography, but not if you don't have your camera.

Late instar grasshopper

This is the guiding principle of street photography, but we hardly think of it for nature photography. It's as if "nature" has retreated to its own little place in the world, and we can't encounter it unless we go specifically looking. Well, I contend that this is a false notion. Due to encroachment and habitat loss, urban wildlife are becoming more adaptable and more common.

Grasshopper nymph

Of course, as you shouldn't be surprised to hear at this point, insects are the queens of urban animal life. Small and highly adaptable, insect species flourish where other animals are unable to survive. This means that there is likely a whole safari of creatures waiting outside your front door.

...Have you gone to look yet?

Grasshopper nymph

 I wanted to highlight these little grasshopper nymph pictures because I took them in a flower pot outside my apartment door. To clarify, it's not a garden; it's a single flower pot. And it's not even my flower pot. Having my camera on hand whenever I go outside allows me to capture unexpected critters like these. And hey, they look pretty cool, right?

So how about you? Are you glued to your camera, or do you tend to leave it at home?
Insects not your thing? Check out my article on bird photography.

Want to see more tips? Check back every Friday for a new post. Click here to follow me on Tumblr and here to follow me on Bloglovin! Don't forget you can also use the handy sidebar to subscribe via email or RSS feed.

Friday, May 9, 2014

Perspective & Photo Challenge

The Art of photography is just as much a challenge as the Skill of photography. Photography hangs in a strange world, a balance between the vision of the artist and the abilities of the equipment. This is another post about the Art of photography. (You can read my last post about the art of photography here.)

Little bug, big world
One of the struggles of artistic photography is to produce images that are more than just physical documentations of the subject. Sometimes this seems easy, but other times it can be more difficult. This begs the question:

How can I push myself to produce more artistic images?

There are, of course, many answers to this question. One thing I would suggest would be to determine what your goals as a photographer are. What are you trying to convey to the viewer? Are you trying to persuade them, amaze them, terrify them? Or are you trying to capture abstract emotions, melancholy, love, peace? It's up to you, but there's very little chance of achieving your goal if you don't have a clear idea of what it is.

So, besides having a "mission statement" for my work, what else can I do?

Photography is, of course, a visual art. Ergo you must force yourself to produce visually unique and captivating images - you will not be able to achieve your goal if no one wants to look at your work. 

Do this exercise.

I've mentioned this somewhere before, but a great trick to force yourself to expand your visual horizons is to constrain your subject matter. What does that mean? Simple: make yourself take 10 (or 5, or 15, or 20) different images of the same subject.

Dramatic backside view
Challenge yourself to think of different "themes" for each shot, and push yourself to demonstrate different aspects of your subject in each frame. This brief series I've done involves a Reduviid nymph (I believe it is a Wheel Bug but I cannot confirm this). Each picture is distinct in evoking emotion in the viewer, although they were all shot on the same morning, at the same location, of the same insect.

Detailed side view
When I look at these images together, they form a story (for me) about the Wheel Bug nymph. It's small, but is a ferocious predator (look at that vicious proboscis!), and is patterned beautifully. Other people probably look at them and think, "gross, that looks terrifying, why would anyone go near that thing???"

Well, to each her own. If you aren't that person alluded to above, you may want to check out my post on insect photography here.

What do you think about this challenge? Are you going to try it weekend? (If you do and  you upload your photos somewhere, feel free to leave a link in the comments. I'd love to see!)

Want to see more tips? Check back every Friday for a new post. Click here to follow me on Tumblr and here to follow me on Bloglovin! Don't forget you can also use the nifty sidebar to subscribe via email or RSS feed

By the way:


Friday, April 18, 2014

Tiny Delicacies

As a follow-up to last week's post on macro photography, I've decided to dedicate this post to flowers. Not sunflowers, or over-enthusiastic roses, but tiny, delicate flowers, wildflowers, weeds. In other words, flowers that are great subjects for macro photography.


These are the sorts of flowers, just centimeters across, that are trampled by hikers, unnoticed in the great outdoors. In last week's post, I talked about the wonder of macro photography stemming from the artist's ability to expose an unseen world to the viewer. In many cases, these flowers appear strange or unusual simply because we never look at them.

Here are my tips for macro flower photography:

1. Angle


Many of these little flowers hang downward. Unassuming from above, their petals often hide intricate structures or patterns that make for appealing visual subjects. Don't be afraid to sit in the dirt to get these kinds of shots - it's okay. No one's looking, right?
Additionally, you can use the angle at which you approach your subject to either emphasize or downplay their tininess. 

 2. Appreciate Detail
As mentioned above, these flowers often hide complexities that we otherwise do not appreciate. Don't be afraid to get as close as you can, even taking extreme macros if you have the equipment to do so.
Bluebonnet
Even familiar flowers, like this Texas bluebonnet above, can become exotic and unusual when captured with a macro lens. Notice how the detail in the varying flower structures keeps the image interesting, balancing the vibrant blue tones.

3. Stability

Macro flower photography suffers from the same difficulties that any other macro photography does - namely, the magnification of unwanted motion in the frame. Particularly for flower photography, the wind can be a frustrating enemy to battle. 

The best advice I can give you, short of buying this device, a clamp designed to hold plants still in the wind, is to shoot in the early morning. You are probably doing that anyway - look at you! The morning tends to be the calmest time of day, in terms of wind. However, some days the weather just won't cooperate with you, and you'll have to find something else to shoot.
Of course, you could always play with artistic effects using a slow shutter speed and wind, but that discussion is for another post.

4. Accept Surprises

One of - in my opinion, anyway - the best things about macro photography is that you sometimes discover one thing while looking for another. Incorporating other wildlife always adds interest to a static shot.

Reduviid bug on Foxglove

So, are you going to try miniature flower photography this weekend? Or is this style of macro not for you? I'd love to hear your thoughts, and thanks for reading!

You can also check out this post I wrote about composition in flower photography.

Want to see more tips? Check back every Friday for a new post. Click here to follow me on Tumblr and here to follow me on Bloglovin! Don't forget you can also use the nifty sidebar to subscribe via email or RSS feed


Friday, April 11, 2014

Very Small Rocks: Macro Photography Basics

Macro Photography Basics


Baby reduviid 

You may have noticed that I kinda have a thing for arthropods. Okay, maybe not "kind of", but definitely certainly. Quite frankly, I love bugs. And while I believe that insects are amazing photography subjects, I realize that macro photography is not as intuitive as other forms of nature photography. Firstly, you need specialized equipment (should I do a post on this? Let me know). Secondly, you need to understand the technical hang-ups with macro work. Finally, you need to really like small things.

So what even is macro photography?

There is actually a technical definition of a "macro" lens - it must render the subject with a 1:2 or 1:1 reproduction ratio. In other words, the subject must be at least half as large on the film as it is in real life. Make sense? (Note: Some sources only consider 1:1 ratios to be true 'macro', but I believe that this is nitpicking).

Dew-laden flowers

Okay, so besides being small, what's the difference?

The main technical difficulty of macro photography is learning how to handle the magnification power of the lens. In short, the extreme magnification creates problems for the photographer.

1. Focusing Problems

At very high magnifications, the depth of field becomes very shallow. Thus it is imperative to focus your images carefully. A few millimeters' change in the focal plane can create entirely different images. Pay close attention that your desired subject is actually the point in the frame you are focusing on. I would recommend using manual focus. As a corollary to this tip, a tripod is helpful in ensuring that you don't accidentally twitch and move your subject out of focus.

Hornet Clearwing Moth
You can see in the image above how shallow the depth of field is. Unless this is the look you are going for, I would suggest stopping down to a very small f-stop to maximize your available depth. 
(If the above discussion about depth of field is confusing you, you may want to head over here to read my article about f-stops.)

2. Choosing the Right Subject

I've spoken (and written) before about how I believe there are 3 main components of a good photograph: lighting, subject, and composition. Depending on the type of photography, these individual elements attain greater or lesser importance. For macro photography, I believe that choosing an appropriate subject is paramount.

Parasitized Tobacco Hornworm Caterpillar
You should seek out subjects with interesting patterns, textures, or behaviors. Okay, you say, I'm supposed to be doing that anyway. And that's true -  but the key here is to discover subjects that are not easily appreciated with the naked eye. With the magic of your macro lens, you are transporting the viewer to place she cannot otherwise go. In short, your camera becomes a tool with which to expose a hidden world. In my obvious opinion, insects make wonderful macro subjects, as their bodies are etched with color and detail we rarely notice at our native scale.


Hover fly
3. Lighting Difficulties

Because of the issues discussed in tip #1, macro photographers often stop down very far. This results in little available light to shoot with, and thus blurry images. To combat this problem, many photographers choose to use flash to illuminate their macro images. Personally, I prefer the appearance of natural light in photographs. However, if you like flash - go for it! But don't let anyone try to convince you that you "need" expensive lighting gear to undertake macro photography. None of my images are shot with flash.


Parting words:

So there are a few technical challenges posed by macro photography, but they are not insurmountable, even for beginning photographers. Overall, the same basics of light, subject, composition hold true with this, and any, genre of photography. While equipment can be expensive, there are entry-level devices that can help elevate your images to the realm of small (macro lenses are even available for smart phones now). Would you like me to write a post about macro equipment? Let me know in the comments.
In the meantime, it's insect season again! Get out there, and get CLOSE.

If you're interested, in this article, I talk briefly about finding great insect subjects.


Want to see more tips? Click here to follow me on Tumblr and here to follow me on Bloglovin! Don't forget you can also use the handy sidebar to subscribe via email or RSS feed. Check back next friday for a new post, and thanks for reading.


Friday, March 28, 2014

Spring Medly: Spring Nature Photography Tips

Spring Nature Photography

So, depending on where you live, it is either already Spring or just about to become Spring. The photographer's year restarts, flowers bloom, and suddenly even people who aren't nature photographers want to be outside. The calendar turns.

The return of warmer temperatures means that there is a flurry of animal activity happening, providing ample opportunity for even the off-season photographer to snag a few nature pics. But, let's be honest with each other - you probably aren't excited about producing the same trite images of daisies you captured when you first picked up a camera at age 12. Indeed, there is more to Spring nature photography than flower buds.

Think about the changing season.

Spring hasn't begun in earnest yet where you live? Good! A world in flux makes for interesting photographic opportunities. Here, dried winter leaves are rendered against a background of soft spring green. Strong golden backlighting brings more interest to the picture, evoking in the viewer a sense of sunrise, of the beginnings of spring.


Remember that with spring blooms come the animals that rely on them.

You didn't really think I was going to publish a post about spring without including photos of insects, right? While I love detailed macros of insect life (see my post here), spring gives an abundance of opportunity to capture insects interacting with their environments. 
Here you can see a bee sneaking nectar from the base of a flower.
There is a strong tendency in nature and macro photography to get as close as is physically possible to your subject. While this technique also produces stunning images, don't forget to add variety to your work by stepping back one in a while.
I particularly love the metallic blue of the insect against the pink flowers.
Try to incorporate contrasting colors into your photographs.

Spring is full of so many colors, it can become a bleary visual racket. If possible, make use of your color wheel and try to compose images with colors that belong to the same family. Or, be even more daring (ooh!) and combine contrasting colors to add spark to your images.

White-Lined Sphinx Moth
Here you can see how the rich purple of the flowers plays against the orange-red warning markings on the moth. This contrast makes both colors appear more vibrant to the viewer.

Ok- that's all I've got; it's your turn now! Is it spring where you live yet? What is your favorite thing to photograph in springtime?

You can read last year's post about Spring photography here.

If you want more, you can follow me here on Tumblr and here on Bloglovin', or subscribe via RSS feed or email by using the snazzy sidebar options. Check back here every Friday for a new post!


Friday, March 14, 2014

Compose Yourself - Photography Basics, Part 3

Photography Basics Part 3: Composition and the Rule of Thirds

Read Part 1 and Part 2

In the previous installments of this series, we've talked about shutter speed and aperture - the foundations of a technically good photograph. However, we both know that there is more to an excellent image than high technical skill. This week, we will talk a little bit about the art of photography.

What does composition even mean?
"Composition" refers to the way elements are arranged in the frame. One of the difficulties of photography is learning to actively "see" all of the items in the frame. The brain naturally has a tendency to filter out superfluous or distracting items in the field, while you are acutely focused on your subject. It may not be until after you get home and are reviewing your shots that you realize your cousin Bob's red hat is glaringly present in the corner of each image. Learn to critically evaluate the scene as you are shooting to avoid these types of errors.

What is that "rule of thirds" thing you mentioned in the title?
The Rule of Thirds is a classic rule of art that helps organize and define what makes a particular composition pleasing, or not. The Rule is simple: divide the frame into thirds both ways, so that you have a grid. Your subject ideally should sit at any of the intersection points in the grid. Make sense?

Here is an example.

You can see that I am close but not exact in aligning the top right flower with the grid.
Here is another example:

The idea is not necessarily to be perfectly aligned with the grid (although if you are that good at geometry, more power to you), but rather to avoid plopping the subject dead center.

Why is a centered shot bad?
A "centered" composition can deaden an image, as it leaves no room for the viewer's eye to wander about the frame. The eye is automatically drawn to the center of the image, where it stays. In an off-center, or rule of thirds obliging image, the eye starts at the center and then is engaged to move around the frame by the off-center subject.

So, what you are telling me is, I should never use a centered composition?
Well, no. There are some instances in which a centered composition can produce a very dynamic image.
Fort Worth Zoo
In this example, the heads of the rhinos are centered, while their bodies act as "interest points" spanning away from the main subject. The viewer's eye fixes initially at the central point, then is drawn out to the edges of the frame, and back again into the center. The central placement of their heads visually "draws" the image together.
A center-heavy composition also emphasizes balance, symmetry, and peace. In short, there are no hard rules, although the rule of thirds is an excellent guideline, particularly for beginners.

Don't forget to read Part 1 and Part 2 of Photography Basics.
If you want more, you can follow me here on Tumblr and here on Bloglovin', or subscribe via RSS feed or email by using the snazzy sidebar options. Check back here every Friday for a new post!


Friday, March 7, 2014

Under a Somber Sky: Lighting Tips


The morning greeted me with a chill silence, grey and damp. Clouds blanketed the sun and the heavy humidity stuck to my skin. I shivered and zipped up my sweater.
Today would be a great day for macros.


As photographers, we worship the light, chase it, cater to it, long for it. However we must not forget the utility of cloud cover. Clouds allow for soft, diffused light that coaxes the vibrancy from flower petals and greenery. In harsh daytime light, many of the subtle colors of flowers get washed out or overwhelmed by the sheer intensity of the light. Heavy cloud cover prevents this problem, allowing for brilliant portraits. 
Of course, with the heavy clouds overhead the problem of darkness follows - it may be too dim to get the fast shutter speeds needed for sharp images of quick-moving insects or birds. Thus, I mostly stick to shooting flowers in these circumstances - but that doesn't mean you have to.
Diffused lighting allows for the delicate color palette of this flower to be captured without the "bleaching" of the white petals produced by bright overhead sunshine
A morning with heavy cloud cover provides other opportunities as well. The lack of sunshine means that morning delicacies such as dew hang around longer, as the light needed to evaporate them is missing.
Here you can see not only the dewdrops, but how vibrantly the blue and yellow tones have been rendered.


Dew drops are always a treat to discover because they add another layer of detail to macro subjects. The layered textures in the above photograph create new interest in an image that otherwise would rely on color and composition only.

Finally, soft morning light allows for more detail to be rendered in textured subjects, versus harsh, overhead midday light. Strong noontime lighting will destroy the subtle shadows of fine textures, such as the veining on this leaf above. Note also the richness of the color tones afforded by the overcast lighting.

What do you think about photographing under cloud cover? What is your favorite kind of lighting? I talk about evening lighting in this post.
If you enjoyed this post, you can find me here on Tumblr or follow me here on Bloglovin'. In addition, you can utilize the snazzy sidebar items to subscribe via email or RSS feed. Check back every Friday for a new article!
Thanks for reading!

Friday, February 28, 2014

Shutter Aflutter: Photography Basics: Part 2

Photography Basics Part 2: Shutter Speed

See Part 1
Part 3

In this week's episode of "photography basics," we will be talking a little about what shutter speed is and how you can use it to improve your images.

So, what is shutter speed?
In last week's post, we talked about aperture, and how it helps determine how much light reaches your film. Well, the shutter is like a curtain that sits between the aperture and the film/chip. The speed at which the shutter is raised up and down determines the exposure time - how long light is allowed to hit the film.

So what does that mean?
A fast shutter speed means that the film is exposed to light for a shorter time, while a slow speed allows for a longer exposure - and thus more light. Of course, the aperture size also impacts how much light reaches the film.

Shutter speed is expressed as a fraction of time, say 1/250 seconds. Thus, a larger number indicates a faster speed, and also less available light for the exposure. A darker setting, for example indoors or in the evening, will generally require a slower shutter speed and a larger aperture to permit enough light to reach the film to make a decent exposure. Conversely, a bright setting, such as a beach at midday, will allow for a faster shutter speed and/or a smaller aperture.

These decisions are artistic as well as technical.

So does it matter to me if I need to use a slow shutter speed?
Well - yes. As mentioned above, a slow shutter speeds equals a longer exposure. Thus, any movement that occurs in the frame during the time of the exposure will be recorded.

Taken with a shutter speed of 1/60 at f/6.3, and a focal length of 100mm
You can see here that a slower shutter speed shows movement as blurring in the frame. You can use this to your artistic advantage to create interesting depictions of motion. However, it can also work against you. A shutter speed that is too slow allows for unwanted blur in the image, particularly if you are shooting with a long telephoto lens. This is called "motion blur." It occurs either because you moving the camera slightly as you shoot (get a tripod!) or because the animal/subject has moved suddenly in the frame.

A good rule of thumb to avoid motion blur is to shoot at a shutter speed of at least 1/focal length. So, for example, if I am shooting at 300mm, I don't want to be using a shutter speed of under 300 without a tripod to stabilize.

Here is an example of motion blur! It's not pretty - this photo is no good. Shot at a shutter of 1/40 at f/5 with a focal length of 200mm. The shutter is not fast enough to stop the motion of the bird.
So then what does a fast shutter mean?
A fast shutter speed means that the film is only exposed to light for a very brief period of time - thus, you need to be in a situation with a lot of available light.
A fast shutter speed is able to "freeze" motion, and can be good to capture detail in action shots and avoid motion blur, as discussed above.
Osprey at Bowman's Beach, Sanibel island. Shot at 1/1250s, f/5.6 with a focal length of 300mm
Here you can see the difference the fast shutter speed makes! The osprey is frozen in flight, with all of the detail preserved, and no blurring. It is artistic preference whether or not you choose to shoot motion like this or with a slow shutter.

Hummingbird Moth - 1/640s, f/5, focal length of 100mm
This is an example of an intermediate shutter speed. You can see that it is not fast enough to "freeze" the motion of the moth's wings, but it is able to stop motion of its body. Thus, you get detail preserved in the body of the insect and a soft blurring of the wings, representing flight.

I personally prefer the look of images taken with fast shutter speeds, so I usually set my camera to the largest (widest) aperture available to allow for the most light and the fastest shutter. Of course, sometimes I make adjustments to the aperture to create different depths of field - it all depends on the look I am trying to achieve. 

I hope that this article was helpful and allowed you to understand a little bit more about those funny numbers on your camera! If you're interested, here is Part 3 of the series.

Which look do you prefer - fast or slow shutter?

Want more? Check back every Friday for a new post! You can find me here on Tumblr and follow my blog on bloglovin here. You can also use the nifty sidebar options to subscribe to my blog via email or RSS feed. As always, thanks for reading!

Friday, February 21, 2014

The F Stops Here: Photography Basics Part 1

Photography Basics Part 1: A Practical Guide to Aperture

View Part 2
View Part 3

This is going to be the first post in a small series explaining some technical photography basics which can help you improve your photography skills. With the improving sophistication of automatic metering systems in digital cameras, technical knowledge of photography is becoming less necessary. However, if you want to have artistic control over your images, you should learn a few basics.

What is an F stop?
"F stop" is another term for "aperture." Aperture is the name for the hole through which light reaches the film - or digital chip - when the shutter is lifted. This allows for exposure of the film/chip and also focuses the light onto the surface.
The F stop is expressed as a fraction. Thus, "larger" numbers actually mean a smaller aperture. For example, when people talk about "F 16," they really mean f/16, or f over 16. F/8 is therefore a larger aperture than f/16.
These numbers, by the way, are based on a mathematical sequence and they are scaled such that each number down (bigger number but smaller aperture) represents a halving of the light intensity from the previous stop.
Make sense?

What does that mean for me?
The size of the aperture determines two things: 1. The amount of light that reaches your film (in conjunction with your shutter speed, which is next week's topic), and 2. Depth of Field (which is mostly what we will focus on today).

What is depth of field?
Depth of field is a measure of how far back in the frame objects remain in focus.
This is an example of a picture with a shallow depth of field. It was taken with f/5.
You can see here in the example above that detail has only been captured in the lacewing's head. Objects father away from the camera, the rest of the picture, blur softly out of focus. This technique is often used for pleasing artistic effect.
Here is another example:
This picture also displays a shallow depth of field. It was taken with f/6.3
A shallow depth of field allows all attention to be focused on the subject, because background objects are not rendered in detail. This can be advantageous for macro images.
This photo has a greater depth of field. It was shot at f/9.
This photo has a greater depth of field than the previous examples. Note it was taken with a smaller f/stop. A smaller f/stop (eg, f/22) creates a larger, or deeper, depth of field. You can think of this as a small opening focusing the light more sharply, allowing more items in the frame to be rendered in detail. Notice that even items far away from the camera are recognizable. I could have stopped down even farther in this shot to obtain greater detail.

Another example, taken at f/7

What's the deal with the light?
Remember that we said the f/stop affects two things: the amount of light that reaches the film and the depth of field? Well, the farther down you stop (a smaller f/stop, a bigger number), the less and less light reaches the film. This means that your exposure will have to become longer to compensate - and that will be next week's topic (click here to read Part 2 of Photography Basics and here to read Part 3).

Feel free to leave any questions you have below.

Did you see this post about lighting? Check it out!

Want to see more tips? Click here to follow me on Tumblr and here to follow me on Bloglovin! Don't forget you can also use the handy sidebar to subscribe via email or RSS feed.