Showing posts with label spring. Show all posts

Friday, February 27, 2015

Spring Interlude: Flower Photography Tips

Hello all! We've had a bit of warm weather down here in Texas, so spring flowers have already started blooming. I thought I would take the opportunity to talk a bit more about flower photography basics.


Let's get started.

Step One: Think about Focus

Flowers are complicated because they have lots of parts. Think about it: there are petals, leaves, stamens, and maybe even other features designed to attract pollinators. From a nature photography standpoint, these many pieces create a problem, because each exists in a different plane of focus. The pistils and stamens leap forward, leaves droop back toward the ground, and petals hover delicately in between. You can't really capture all of these elements in crisp focus in one frame - so what do you focus on?
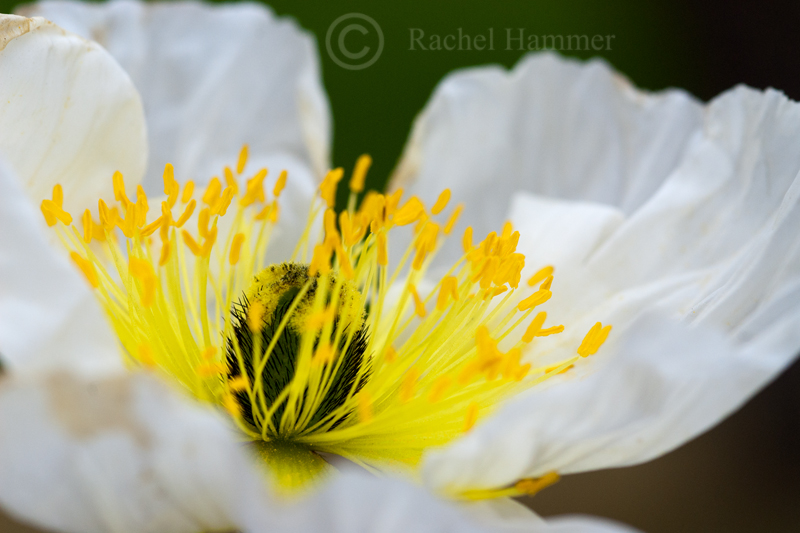


Take these two photos, for example. Which one do you like best? You can see that the focus is slightly different between them, with the second image focusing on the pistils closest to the viewer, rendering the center of the flower soft.

I actually prefer the first image, but I didn't know this while I was shooting. This brings me to my point about how to solve the focus problem - you should experiment in the field, taking different pictures of the same flower but changing your point of focus. Manual focus is very helpful for this.

Step Two: Corral a Composition

Flowers seem to pose one of two compositional problems for the photographer: they are either spectacularly, awkwardly alone, or are clumsily smashed together with many of their brethren. How do you address these problems?
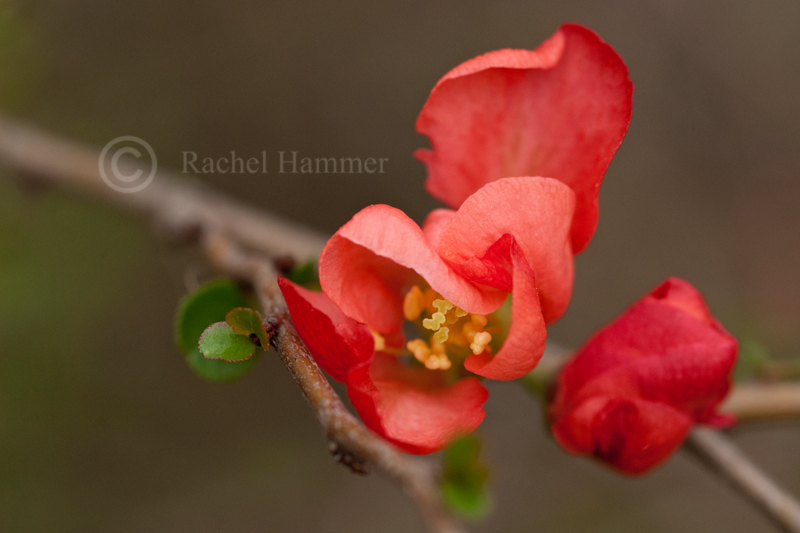

The Awkward Loner

There are a couple ways to deal with the awkward loner. One method, as demonstrated in the photo above, is to include other elements of the plant in the picture. Here, the diagonal branch adds dynamic movement to a static picture of a red flower, alone. The small, green leaves lend contrast and extra detail that help situate the flower in its environment. In short, take a picture of the whole plant, rather than just the flower. This is also a good tip if you do not own macro equipment.

The other treatment the awkward loner often gets is demonstrated by the pictures I showed you earlier. Here, let's look at one again.


A frame-filling macro eliminates the clumsiness of a big flower on a tall, spindly stalk. The downside of this method is that it requires dedicated macro equipment.

The "Too Many Friends" Flower 

Ever try to take a group picture? How about a group picture of children? Then you already know what I'm talking about when I discuss the difficulty of achieving a coherent composition in group photos. Sometimes flowers grow in groups. They grow haphazardly, aggressively, each straining toward the sun in a different direction. It can be difficult to create a pleasing image in these circumstances.


There are a couple of things to consider:

1. Use depth of field to your advantage. You can see in the image above that the flowers in the background are in a different plane of focus from the subject flower. Thus they are softer and not as distracting.

2. Get closer. Crop distracting elements out of the frame, such as large leaves or flowers that are steadfastly not helping your composition.

3. Understand the motion of the picture. Flowers can be difficult to photograph because they are static and can become boring. A group of flowers can lend interest. Notice how the subject flower is pointing upward, while the background flowers are pointing down. This visual conflict simulates motion and encourages the viewer to keep looking.

All right! Those are my solutions to some of the biggest problems I struggle with in flower photography. Now it's your turn - what are some of your best tips for flower photography?

If you enjoyed this post, you can find me here on Tumblr or follow me here on Bloglovin'. In addition, you can utilize the snazzy sidebar items to subscribe via email or RSS feed. Check back every Friday for a new article!
Thanks for reading!

Friday, March 28, 2014

Spring Medly: Spring Nature Photography Tips

Spring Nature Photography

So, depending on where you live, it is either already Spring or just about to become Spring. The photographer's year restarts, flowers bloom, and suddenly even people who aren't nature photographers want to be outside. The calendar turns.

The return of warmer temperatures means that there is a flurry of animal activity happening, providing ample opportunity for even the off-season photographer to snag a few nature pics. But, let's be honest with each other - you probably aren't excited about producing the same trite images of daisies you captured when you first picked up a camera at age 12. Indeed, there is more to Spring nature photography than flower buds.

Think about the changing season.

Spring hasn't begun in earnest yet where you live? Good! A world in flux makes for interesting photographic opportunities. Here, dried winter leaves are rendered against a background of soft spring green. Strong golden backlighting brings more interest to the picture, evoking in the viewer a sense of sunrise, of the beginnings of spring.


Remember that with spring blooms come the animals that rely on them.

You didn't really think I was going to publish a post about spring without including photos of insects, right? While I love detailed macros of insect life (see my post here), spring gives an abundance of opportunity to capture insects interacting with their environments. 
Here you can see a bee sneaking nectar from the base of a flower.
There is a strong tendency in nature and macro photography to get as close as is physically possible to your subject. While this technique also produces stunning images, don't forget to add variety to your work by stepping back one in a while.
I particularly love the metallic blue of the insect against the pink flowers.
Try to incorporate contrasting colors into your photographs.

Spring is full of so many colors, it can become a bleary visual racket. If possible, make use of your color wheel and try to compose images with colors that belong to the same family. Or, be even more daring (ooh!) and combine contrasting colors to add spark to your images.

White-Lined Sphinx Moth
Here you can see how the rich purple of the flowers plays against the orange-red warning markings on the moth. This contrast makes both colors appear more vibrant to the viewer.

Ok- that's all I've got; it's your turn now! Is it spring where you live yet? What is your favorite thing to photograph in springtime?

You can read last year's post about Spring photography here.

If you want more, you can follow me here on Tumblr and here on Bloglovin', or subscribe via RSS feed or email by using the snazzy sidebar options. Check back here every Friday for a new post!


Friday, March 7, 2014

Under a Somber Sky: Lighting Tips


The morning greeted me with a chill silence, grey and damp. Clouds blanketed the sun and the heavy humidity stuck to my skin. I shivered and zipped up my sweater.
Today would be a great day for macros.


As photographers, we worship the light, chase it, cater to it, long for it. However we must not forget the utility of cloud cover. Clouds allow for soft, diffused light that coaxes the vibrancy from flower petals and greenery. In harsh daytime light, many of the subtle colors of flowers get washed out or overwhelmed by the sheer intensity of the light. Heavy cloud cover prevents this problem, allowing for brilliant portraits. 
Of course, with the heavy clouds overhead the problem of darkness follows - it may be too dim to get the fast shutter speeds needed for sharp images of quick-moving insects or birds. Thus, I mostly stick to shooting flowers in these circumstances - but that doesn't mean you have to.
Diffused lighting allows for the delicate color palette of this flower to be captured without the "bleaching" of the white petals produced by bright overhead sunshine
A morning with heavy cloud cover provides other opportunities as well. The lack of sunshine means that morning delicacies such as dew hang around longer, as the light needed to evaporate them is missing.
Here you can see not only the dewdrops, but how vibrantly the blue and yellow tones have been rendered.


Dew drops are always a treat to discover because they add another layer of detail to macro subjects. The layered textures in the above photograph create new interest in an image that otherwise would rely on color and composition only.

Finally, soft morning light allows for more detail to be rendered in textured subjects, versus harsh, overhead midday light. Strong noontime lighting will destroy the subtle shadows of fine textures, such as the veining on this leaf above. Note also the richness of the color tones afforded by the overcast lighting.

What do you think about photographing under cloud cover? What is your favorite kind of lighting? I talk about evening lighting in this post.
If you enjoyed this post, you can find me here on Tumblr or follow me here on Bloglovin'. In addition, you can utilize the snazzy sidebar items to subscribe via email or RSS feed. Check back every Friday for a new article!
Thanks for reading!

Friday, January 24, 2014

Q: How to Give Life to Still Photographs of Still Things

One of the challenges of photography is imparting life and motion to a still record of a scene. In some cases this is quite simple. One frame of an eagle's swoop looks just as exciting as a video of the entire event. Indeed, still photographs of animals in action can intensify the drama, as the viewer begins to anticipate what will happen next, what occurred after the photo.
This is not true of plants. Plants don't swoop, or dive, or flash brilliant and bizarre mating feathers. Plants are the connoisseurs of slow. They grow, they mate, they fight, at a creeping, deliberate pace, too gradual for us to detect.
So how can one lend the same interest and excitement to plant photography as is characteristic of animal photography?

1. Develop an appreciation for color and shape.
Brilliant, saturated colors steep many flowers. However, the key to developing interest and excitement in flower photography is variety of both color and form. An endless field of red flowers may make for a striking landscape, but then become overpowering for a macro shot. To avoid visual oversaturation, try to mix different species of plant in the same frame, if possible. This is often quite easy to do if you are shooting in a botanical garden, where different flowers are arranged for you in ways that are already visually pleasing.

If you are shooting a single type of flower, try to incorporate different parts of the plant (ie stalks or leaves) to add variety. Alternatively, a shallow depth of field can be used to your advantage to paint areas of blurriness and sharpness and avoid monotony.

2. Use Visual Cues to Suggest Motion
In a photograph of a tiger leaping, the brain picks up on visual cues that allow you to interpret the picture as "action" - the stance of the tiger, the position of his paws, or perhaps the fact that he is no longer touching the ground. Similarly, compositional cues in still photos can be used to suggest motion and "trick" the brain.

In this picture, for example, the seed pod has been photographed at a lower angle, making it appear to be emerging from the flowers. This view is much more dynamic than if the pod had been photographed "head-on".
Here's another, more subtle, example.

In this image, the strong vertical lines suggest an upward motion of the flower, which is open to the sun. This composition works to create the feeling that the flower is "reaching" upwards, when, in reality, we know it is (relatively) static.

What sorts of tricks do you use to add interest to your flower photography?

Sunday, April 22, 2012

A Brief Lesson in Entomology

As a nature photographer, I make it my goal to not only document, but also to learn about the creatures I am photographing. Knowledge engenders respect, and respect is an important element in the photographer - wilderness relationship.
It means that we think about our impact on the landscape, and not simply how we might get the most impressive photograph.
On a smaller scale, I believe that identification of subjects is educational and can sometimes even be of scientific interest. As a friend of mine once said, "I get angry when I don't know the names of things."
Laypeople often feel confused by the myriad of buzzing, crawling, and climbing critters around them and resort to calling them all "bugs."
This is all right if you are pointing to a critter on a flower and exclaiming to your friend, "look at that bug!" But, in the age of the internet, I know many of you will further be uploading images of said bug and would like to title it something accurate and informative. There are several websites which can help you with this, one of them being www.bugguide.net . But I will also try to help. Here is a common mistake:
Many people see this unoffending critter and exclaim, "Bee!" 
But this isn't a bee. This animal isn't even in the same order as a bee. This is a hover fly (order Diptera, for those who are interested).
This, on the other hand, is a honey bee (order Hymenoptera):
Here are a few things to look for:
-eye shape - a fly will have large, broad, flat eyes. A bee's eyes will be generally be smaller and set on the sides of the head
-hair: bees are generally much more fuzzy appearing than flies
-wings: bees actually have four wings, while flies have two (this can be hard to see though, as their wings are clear)
-antennae: bees usually have longer antennae than flies
And here is another kind of bee, a carpenter bee, for comparison:

Again, you can see his hairy body, long antennae, and offset, tall oval-shaped eyes.
I hope this was helpful and, as always, thanks for reading!

Photo info:
Nikon D70 + Sigma 105mm f/2.8 macro lens


Saturday, April 21, 2012

Wisdom of the Flowers

I like bugs.
Insects are great subjects for photography because they are unique, exotic, and varied - albeit very small. Their size often necessitates a macro lens to capture their true beauty and detail.
Also, they are accessible.
Many of us nature photographers, myself included, do not have the luxury to jet off to Africa, South America,  or some other locale populated by strange and vibrant megafauna - elephants, monkeys, zebras, leopards - you know.
Bizarre and wonderful insects live in  your backyard. In fact, you can find them even if you don't have a backyard. I found this fellow in a flower pot outside in my apartment complex. I quickly grabbed my camera for a little photoshoot.

He sat rather still for a rather long time, allowing me the luxury of exploring different compositions and depths of field.
I know when I see an animal, particularly one that's flighty, like a bird, come into my viewfinder, I tend to automatically leap to set composition stored away in my brain. Many times, I snap a somewhat generic shot just in time before the critter scurries off. 
But is it worth it?
A still subject allows one the time to think and compose with precision, bringing more creativity into the photographic process. Hopefully this sort of practice will let me have more interesting compositions ready on hand for when the occasion strikes.
I need to stop taking exclusively this picture, basically:
Thanks for reading!
And, as always - get outside people :) Bug season is starting! (At least in the US)
Picture info:
Grasshopper Nymph
Taken with Nikon D70 + Sigma 105mm f/2.8 macro